Quick Start Guide meloki
Before you begin, it is crucial to read and follow all safety instructions. Ensuring your safety and the proper operation of this equipment is our top priority. Please take a moment to familiarize yourself with the safety guidelines provided. Your adherence to these instructions will help prevent accidents and ensure a smooth and efficient setup.
General Information
meloki is a local AI instance specifically designed for customers, providing easy access to powerful AI solutions. This guide outlines the essential steps to quickly set up and start using your meloki system.
The meloki software and AI solutions are installed on the primary NVMe drive. An additional 1TB SSD drive is available. It is used for Backups, you may also use it to store any Input or Output Data (RAG Files, Audio Files or your own models)
Getting started
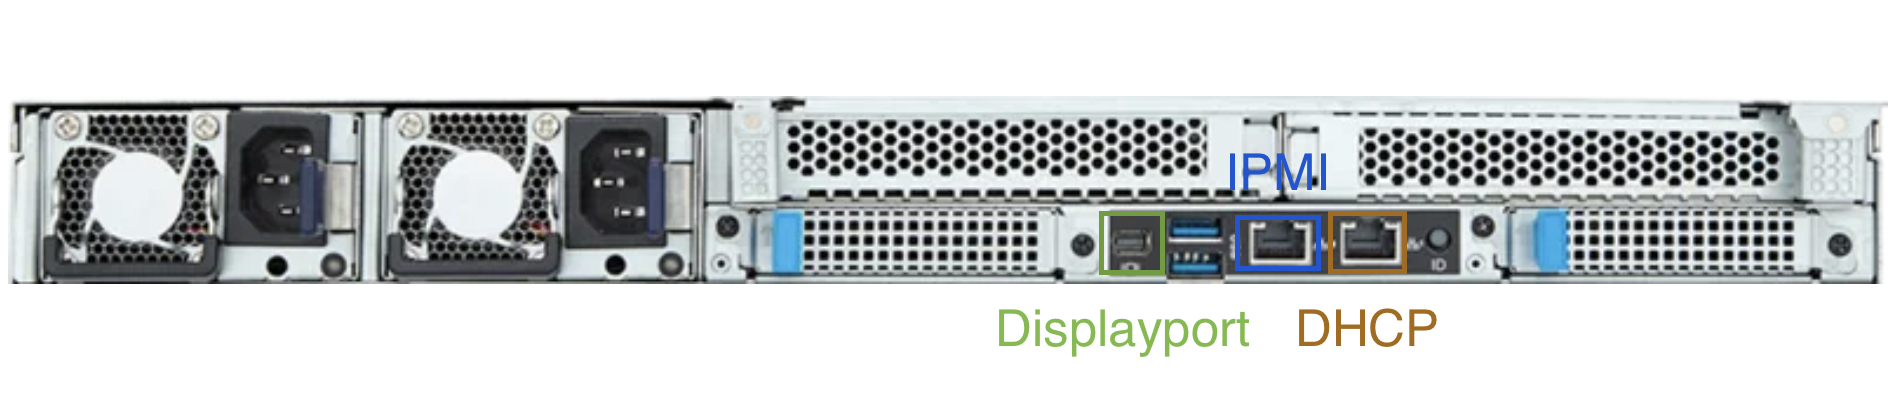
scope7-4480
scope7-4480 offers two network ports with different configurations:
- DHCP Port: Receives an IP automatically from your network
- Static IP Port: Fixed IP address at
172.20.10.1
Connect an RJ45 Ethernet cable to one of the ports depending on your network setup.

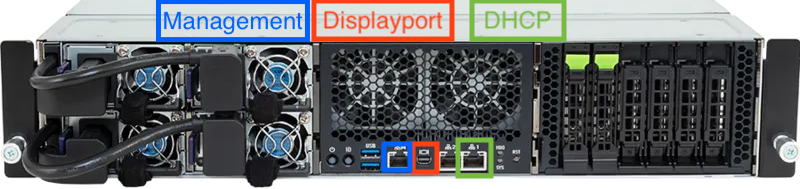
scope7-5580
scope7-5580 offers one network port with DHCP configuration.
scope7-6680
scope7-6680 offers one network port with DHCP configuration.
Accessing meloki
You can access the system either via SSH or through the Web Interface.
meloki requires internet-access to download open-source software or llm models. The inbound Web UI for meloki or the WebUIs from the AI Solutions and the SSH services are for LAN-only management and must be blocked from the WAN by a firewall.
SSH Access
Use the following SSH commands to connect:
- For DHCP-assigned IP:
ssh meloki@<dhcp-assigned-ip>
- For static IP:
ssh meloki@172.20.10.1
Password is secudos.
Web Interface Access
meloki’s WebUI is accessible over HTTPS only.
On First Setup:
https://DHCP-IP/
After Setup:
https://DHCP-IP/meloki
Or use your FQDN with your own SSL cert.
Change IP configuration
If neither DHCP nor the preconfigured static IP can be used, the network settings must be adjusted manually. Connect to the appliance via video or serial console. Once the system has completed booting, a login prompt will be displayed.
Login with meloki and password secudos
login: meloki
password: *******
Next, log in as the root user. Type in su - and for password secudos
meloki@meloki:~$ su -
Password: *******
Open the configuration file by using nano or vi/vim. This example continues with vim.
Network interface for scope7-4480
meloki@meloki:~$ vim /etc/network/interfaces
You should see this file:
# This file describes the network interfaces available on your system
# and how to activate them. For more information, see interfaces(5).

source /etc/network/interfaces.d/*

# The loopback network interface
auto lo
iface lo inet loopback

# The primary network interface
auto enp5s0
iface enp5s0 inet dhcp

# The secondary network interface
auto enp6s0
iface enp6s0 inet static
        address 172.20.10.1/24
To change the default static IP on interface enp6s0 from 172.20.10.1/24to 192.168.20.5/24 and to define a Gateway and DNS, the file would look as follows:
# This file describes the network interfaces available on your system
# and how to activate them. For more information, see interfaces(5).

source /etc/network/interfaces.d/*

# The loopback network interface
auto lo
iface lo inet loopback

# The primary network interface
auto enp5s0
iface enp5s0 inet dhcp

# The secondary network interface
auto enp6s0
iface enp6s0 inet static
        address 192.168.20.5/24
        gateway 192.168.20.1
        dns-nameservers 192.168.20.1
Network interface for scope7-5580
meloki@meloki:~$ vim /etc/network/interfaces
You should see this file:
# This file describes the network interfaces available on your system
# and how to activate them. For more information, see interfaces(5).

source /etc/network/interfaces.d/*

# The loopback network interface
auto lo
iface lo inet loopback

# The primary network interface
allow-hotplug eno1
iface eno1 inet dhcp
To change the default dhcp IP on interface eno1 from dhcpto 192.168.20.5/24 and to define a Gateway and DNS, the file would look as follows:
# This file describes the network interfaces available on your system
# and how to activate them. For more information, see interfaces(5).

source /etc/network/interfaces.d/*

# The loopback network interface
auto lo
iface lo inet loopback

# The primary network interface
allow-hotplug eno1
iface eno1 inet static
        address 192.168.20.5/24
        gateway 192.168.20.1
        dns-nameservers 192.168.20.1
Save the file changes. In VIM with :wq
Apply the new configuration with
systemctl restart networking
Network interface for scope7-6680
meloki@meloki:~$ vim /etc/network/interfaces
You should see this file:
# This file describes the network interfaces available on your system
# and how to activate them. For more information, see interfaces(5).

source /etc/network/interfaces.d/*

# The loopback network interface
auto lo
iface lo inet loopback

# The primary network interface
allow-hotplug eno1
iface eno1 inet dhcp
To change the default dhcp IP on interface eno1 from dhcpto 192.168.20.5/24 and to define a Gateway and DNS, the file would look as follows:
# This file describes the network interfaces available on your system
# and how to activate them. For more information, see interfaces(5).

source /etc/network/interfaces.d/*

# The loopback network interface
auto lo
iface lo inet loopback

# The primary network interface
allow-hotplug eno1
iface eno1 inet static
        address 192.168.20.5/24
        gateway 192.168.20.1
        dns-nameservers 192.168.20.1
Save the file changes. In VIM with :wq
Apply the new configuration with
systemctl restart networking
At this point, Meloki is available using the custom configuration. Meloki will not modify this configuration.
First Setup wizard
The wizard guides you through necessary configurations.
You can change these settings later at any time.
 Click Start Now to start the wizard.
 Set your own Device Name.
You must provide your FQDN or the current IP in the FQDN/IP Input.
Click Next
 Change the Timezone for your region.
Click Next
 Default values for Docker networking are provided here.
If they conflict with existing networks, they can be adjusted accordingly.
Click Next
 SSL certificates are used for meloki and Chat & RAG WebUIs.
SSL Certificate and SSL Key are mandatory.
We recommend to install the SSL Certifiate Chain.
When all Certificate files are selected click Upload Certificates.
Click Next

An internet connection is required for initialization. The internet is needed to initially download the containers and models.
After downloading, no internet connection is required for use. Only further updates would require an internet connection.
 This is the final page of the wizard.The setup is nearly complete.
Remember the default credentials.
Click To Login
It is strongly recommended to change this password after the first login.
The wizard initialisation is now finished, after a while you are redirected to the login page.
At this point, meloki admin panel is only accessibly via /meloki
meloki Admin Panel
The admin Panel requires an authenticated user.
 Login in with meloki as username and meloki as password.