Connect AzureAD
AzureAD is now called Entra ID.
AzureAD Configuration
In order for Qiata to work with Azure Active Directory, you will first need App registration within your Azure Active Directory. To do this, log in to the web interface of your Azure Active Directory.
The following instructions show an example connection between an AzureAD and Qiata. Depending on the security settings and configuration, customer modifications may be required.
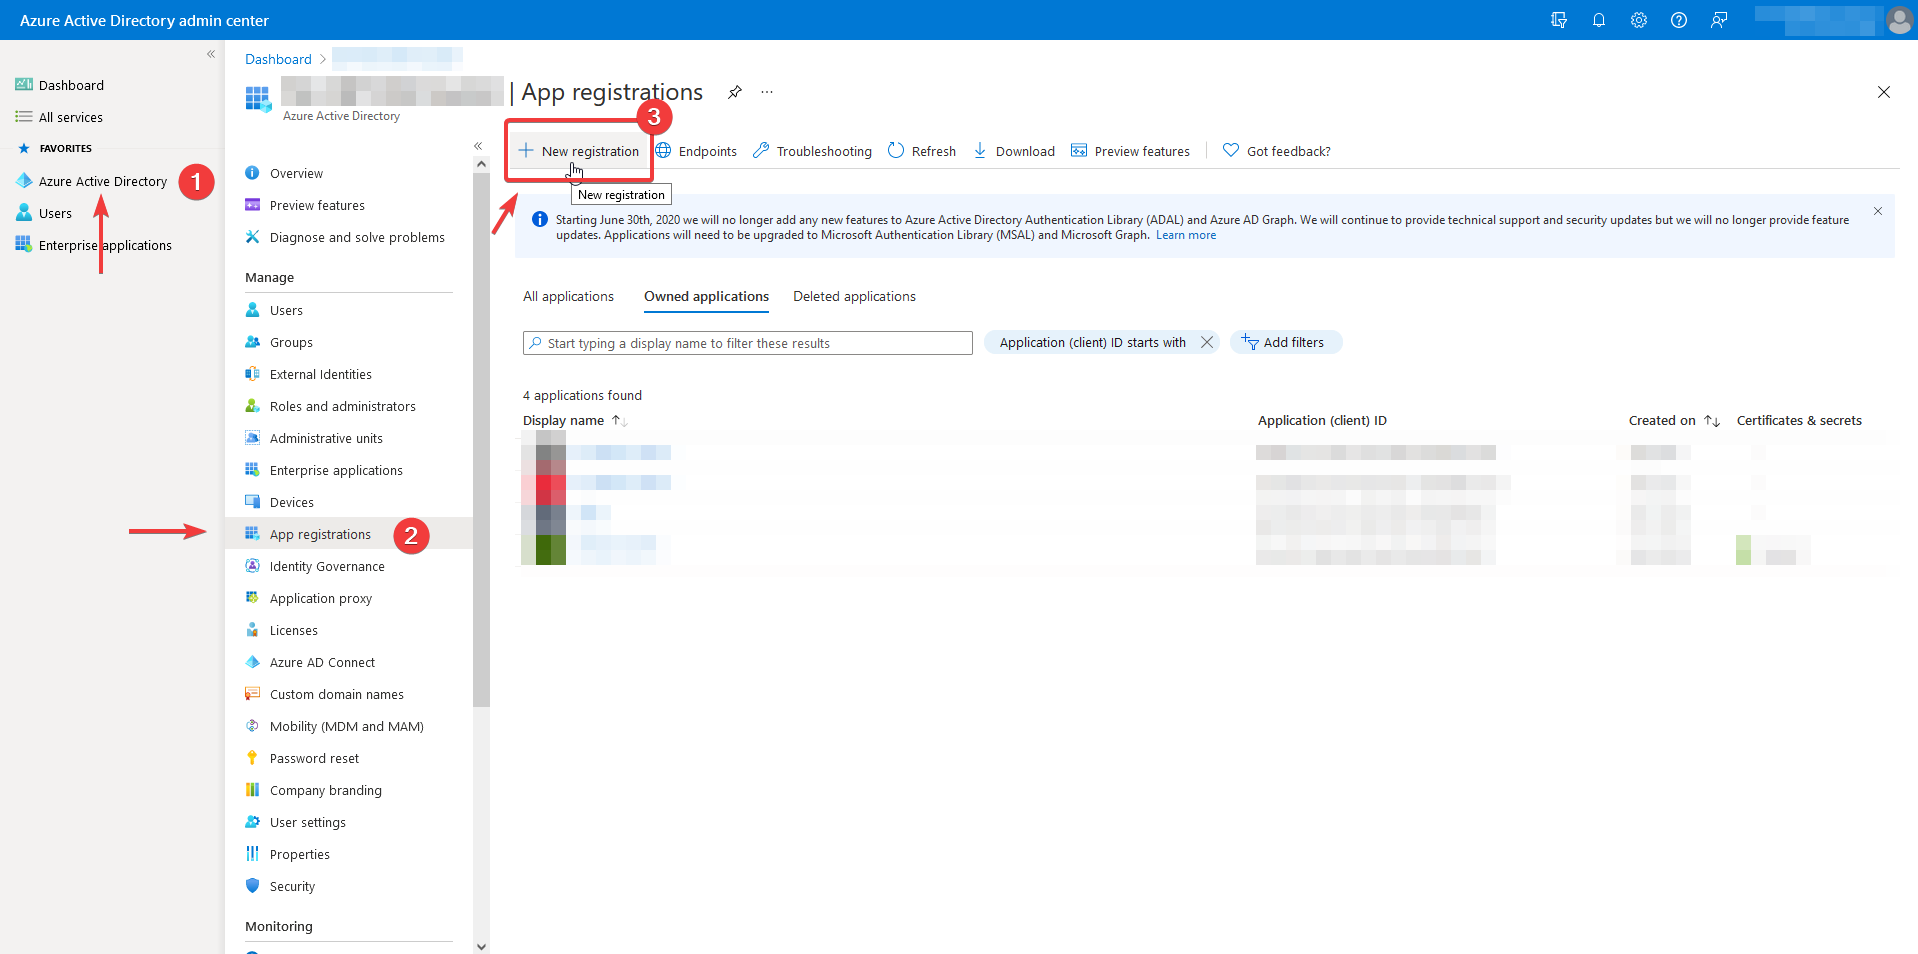
Navigate to the App Registration menu item and then New Registration.
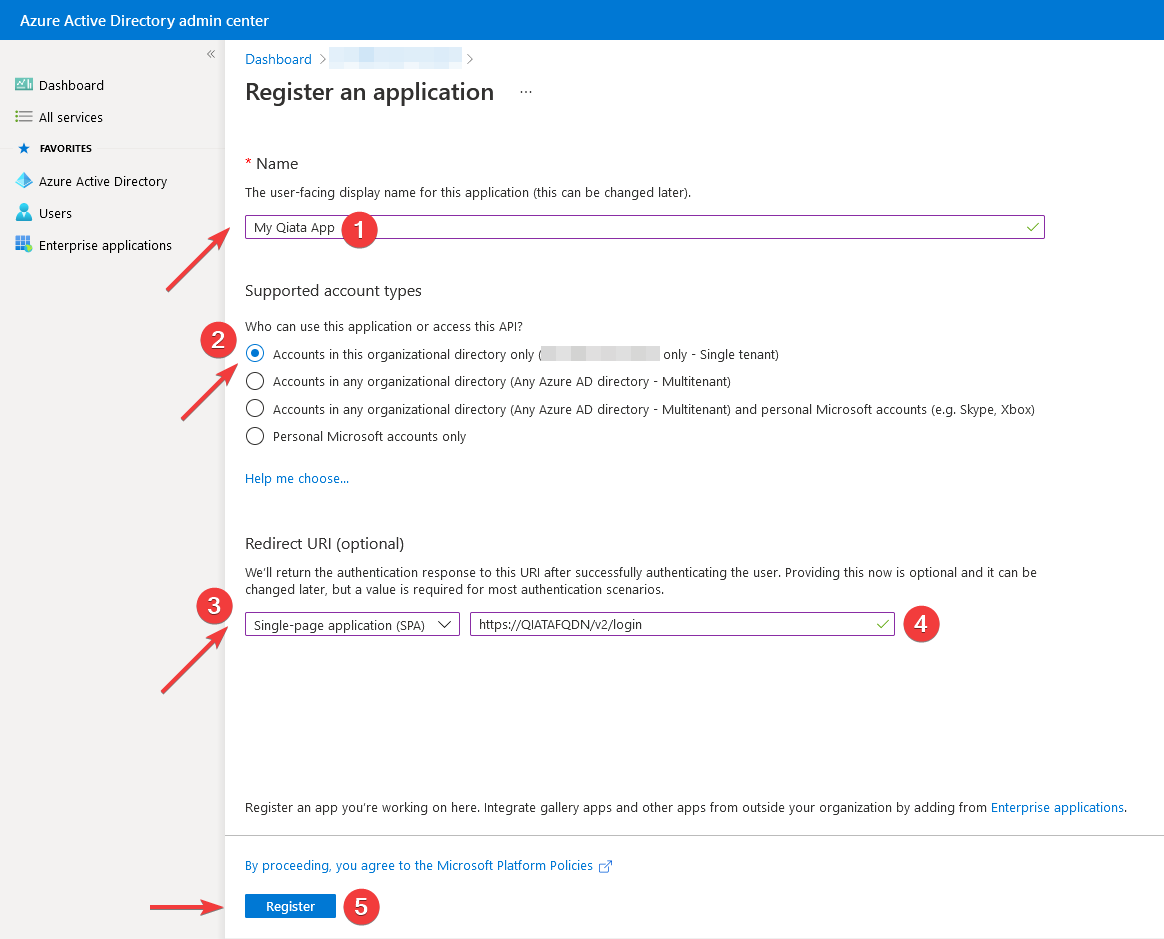
Register application
-
Choose a name for your app (example: My Qiata App).
-
Select which users should have access to this app.
-
Select Single page app as type.
-
Enter the FQDN of your Qiata including login parameters (example: https://YOURQIATAFQDN/v2/login)
-
Finally click Register.
Redirect-URIs
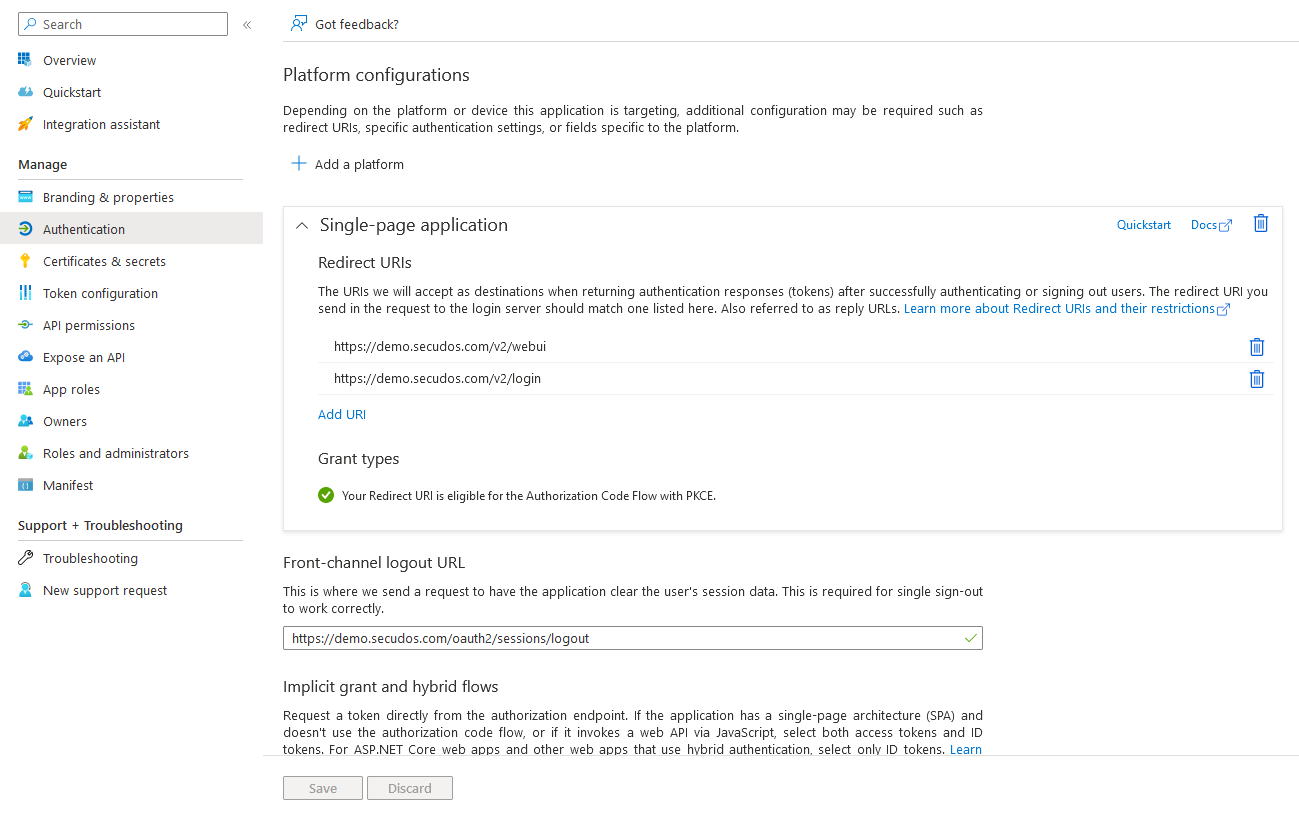
Click the Authentication menu item and add additional redirection URIs. The following redirection URIs must be entered for the SPA (Singe Page web application):
https://demo.secudos.com/v2/login(Already entered during registration).https://demo.secudos.com/v2/webui
Set Front-Channel Logout
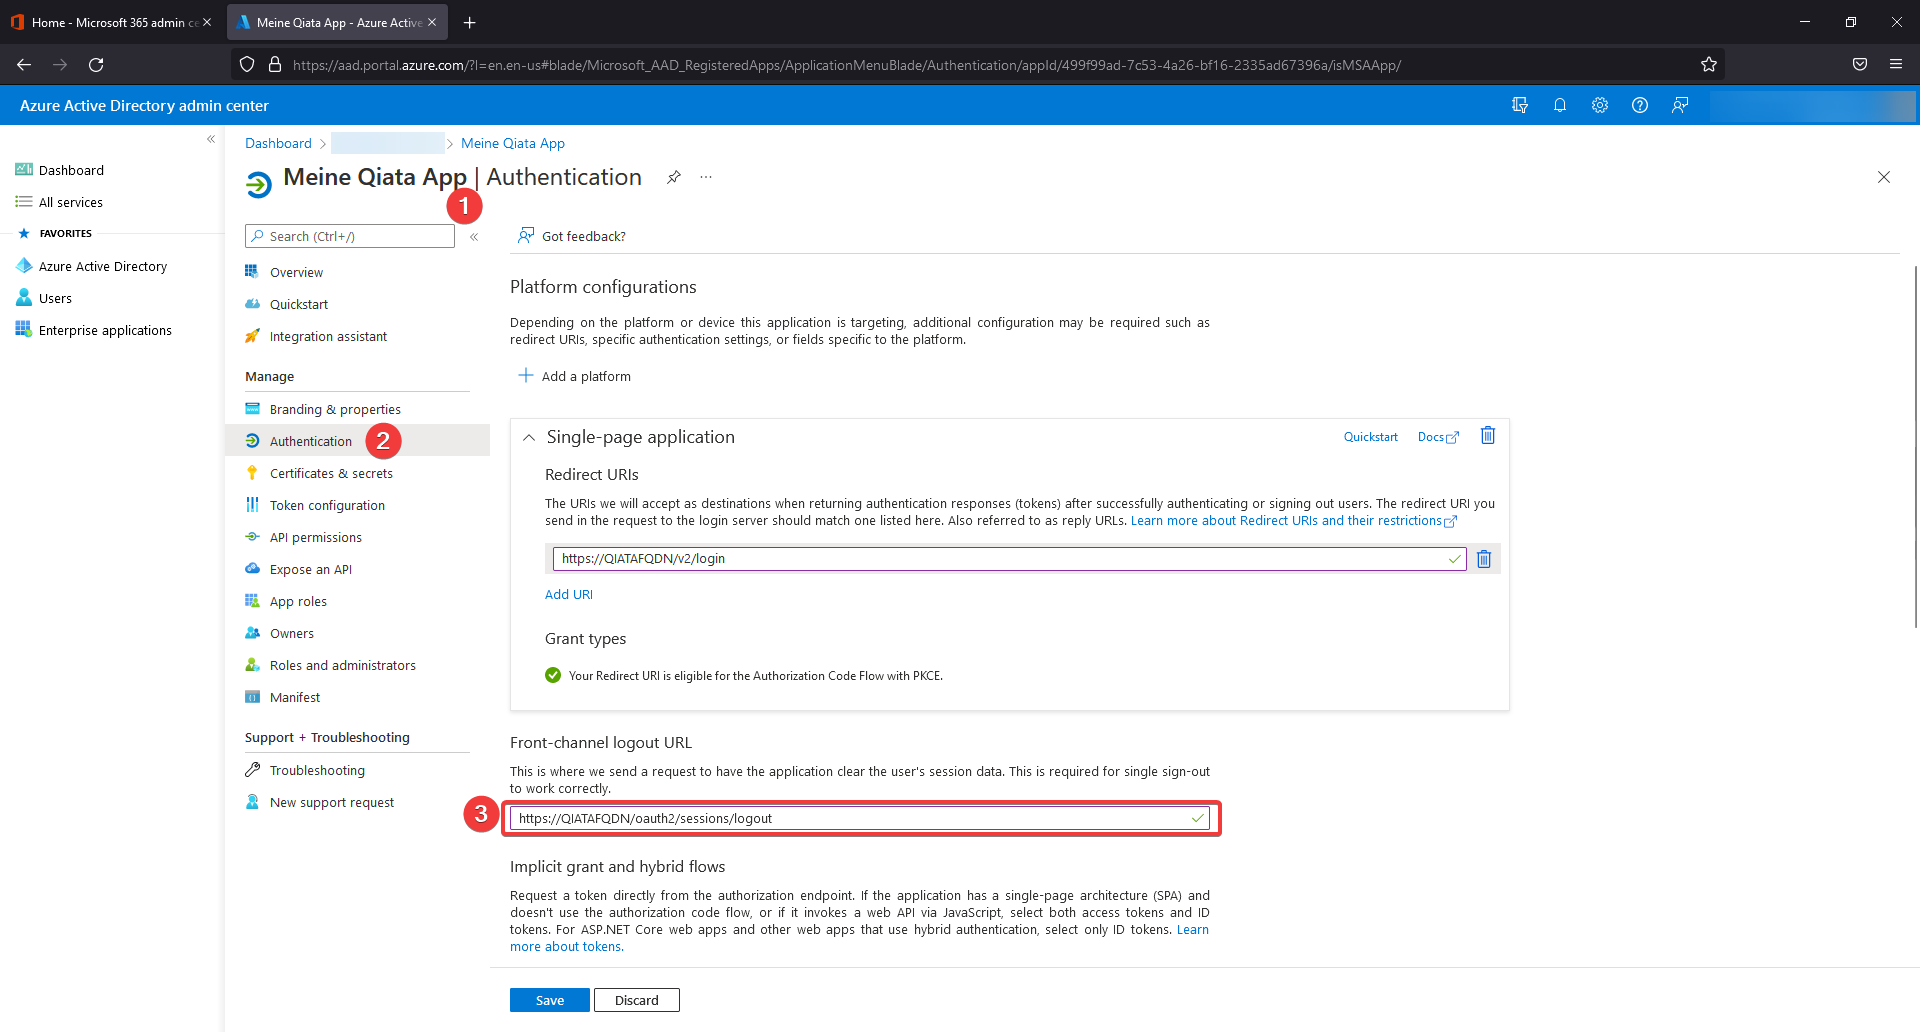
Switch to the Authentication section and scroll to the Front-channel logout URL item. There, enter the logout URL of the Qiata according to the following pattern: https://QIATAFQDN/oauth2/sessions/logout.
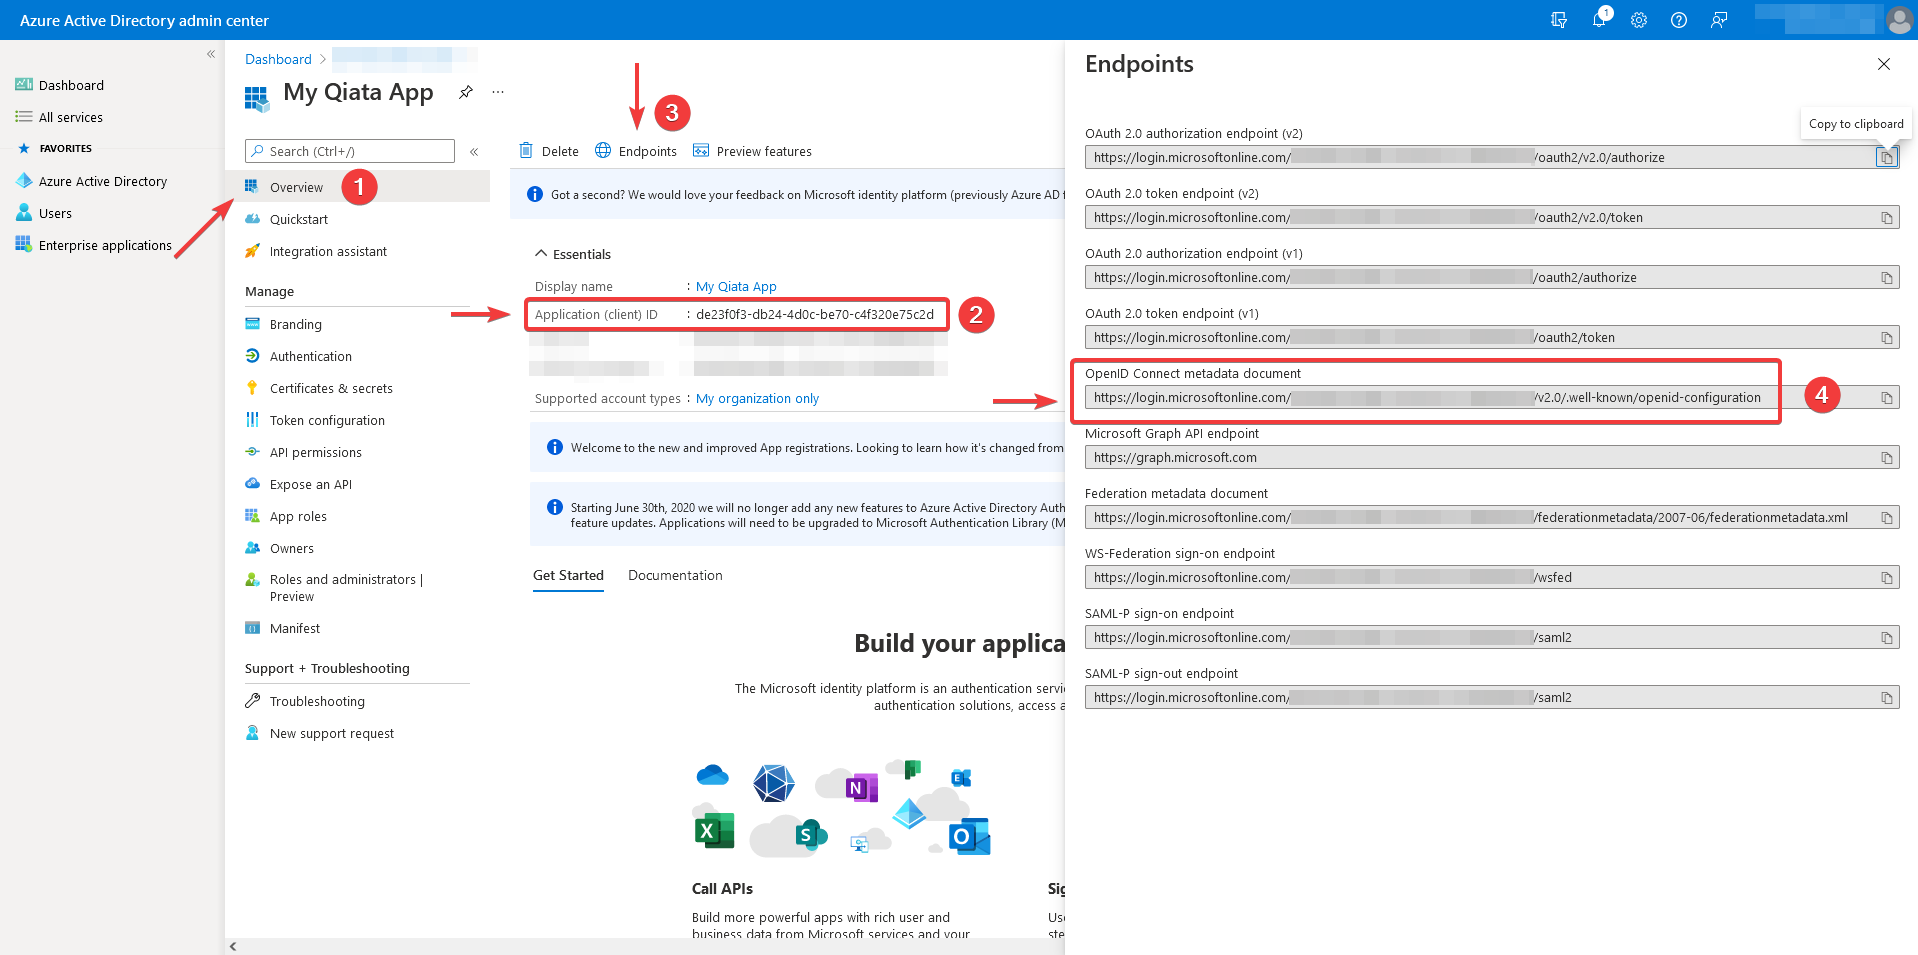
Endpoints and Client-ID
-
Navigate to the menu item Overview.
-
Save the Application ID (Client) in a safe place. This will be necessary for later configuration within Qiata.
-
Click on the Endpoints button.
-
Doesn't your OpenID Connect metadata document include your TenantID?
https://login.microsoftonline.com/organizations/v2.0/.well-known/openid-configuration
Then, please replace 'organizations' with your TenantID.
You can find your TenantID in the Overview too. DirectoryID.
Example, fictitious TenantID:
https://login.microsoftonline.com/1806966a-491d-476c-a77d-ddbacffed6ba/v2.0/.well-known/openid-configuration -
Save the path of the OpenID Connect metadata document to a secure location. This will be necessary for later configuration within Qiata.
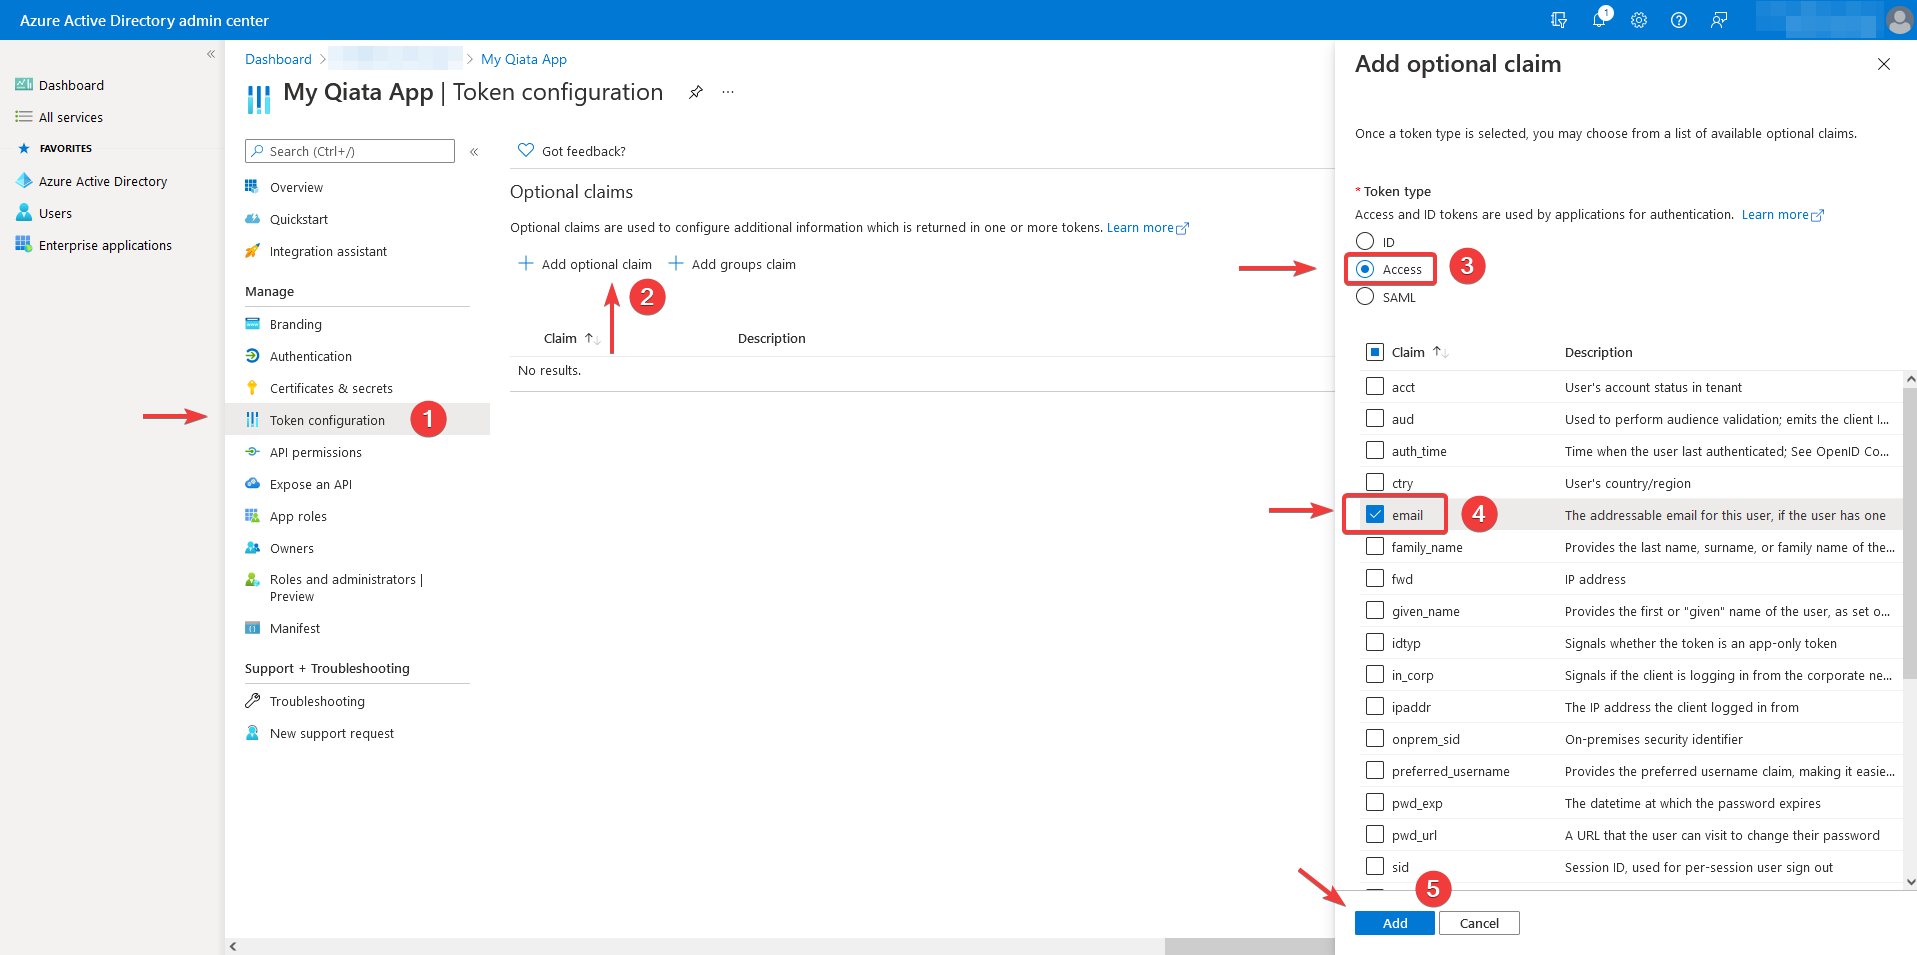
Tokenconfiguration
Add optional claim
-
Navigate to the menu item token configuration.
-
Click on Add optional claim.
-
Select Access as token type
-
Activate the checkmark at the claim email
-
Finally, click Add.
After adding the Optional Claim, you will get a notice that the Microsoft Graph Permission is required. Check the (1) checkbox and then click Add.
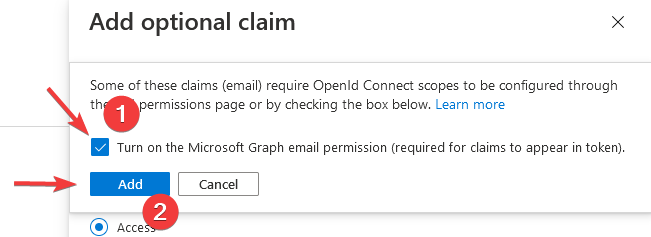
This authorization is necessary for the claims to be available in the respective token. Qiata always requires an email address to identify the user.
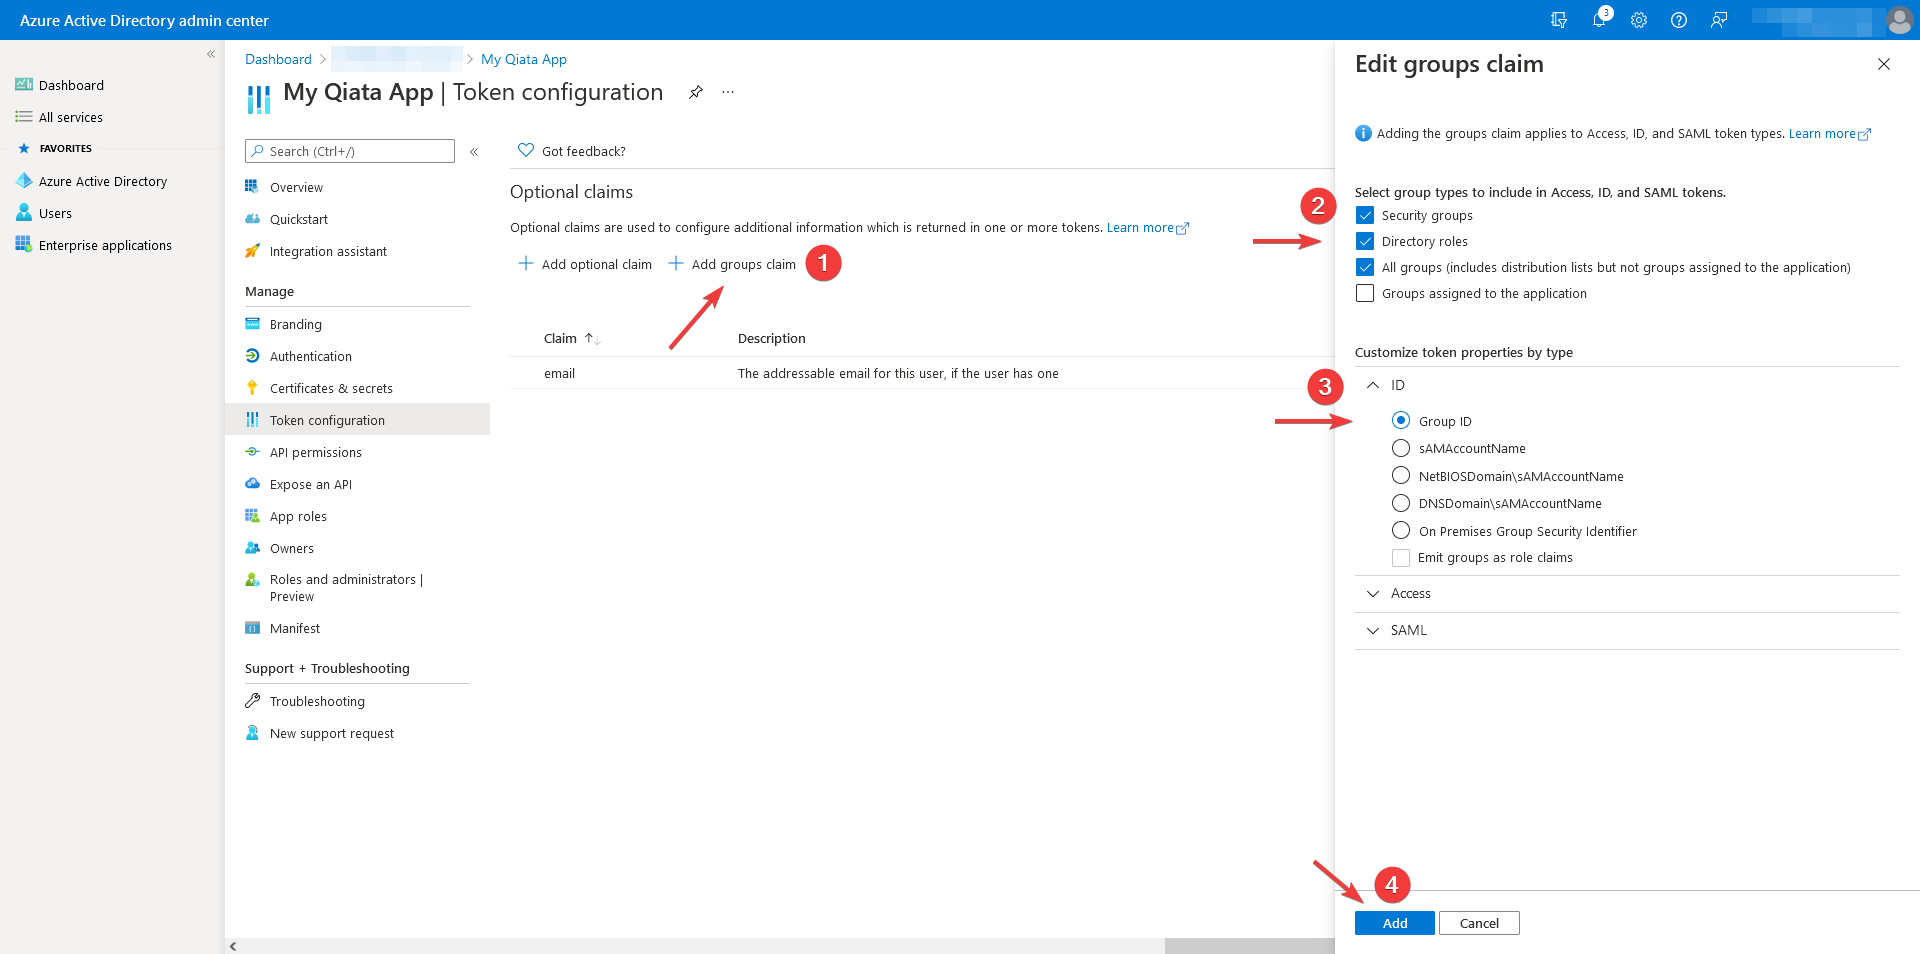
Add group claim
-
Click Add group claim.
-
Select the types All groups. This automatically enables the Security Groups and Directory Roles types.
-
Select the token type Access and click Group ID.
-
Finally click Add.
In order to place users in the correct groups within Qiata, Qiata requires an optional claim, or group claim. This must be unique and point to the appropriate users. In our example, we use the group ID for this. However, this value can vary depending on the configuration.
If you want to use Qiata Outlook Add-In Next Gen in addition, please follow the steps in the instructions: Add-In NG Configuration
Qiata Configuration
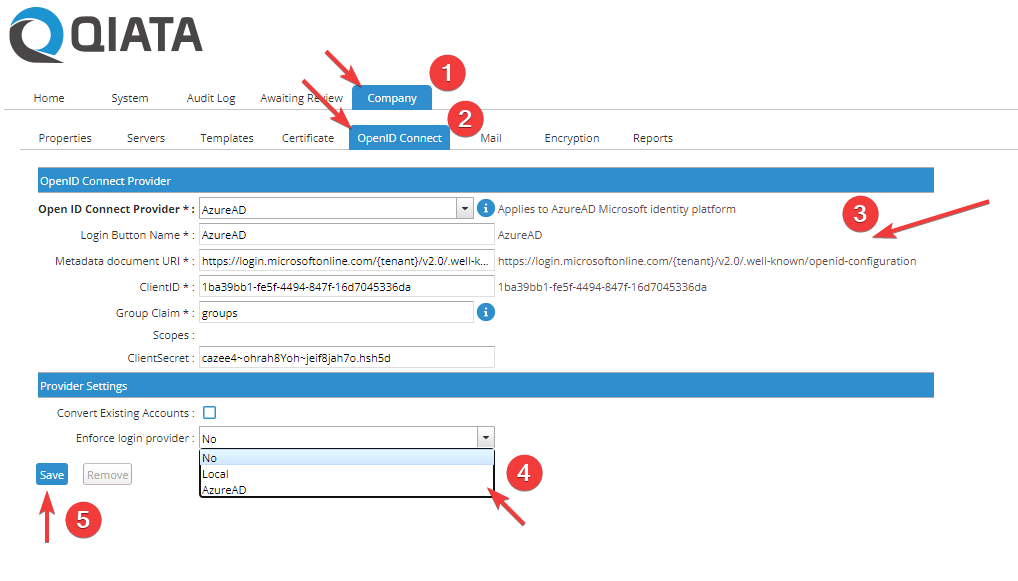
Log in to the system as Company Administrator and navigate to the item Company -> OpenID Connect. Now fill in the form.
- Open ID Connect Provider.
Choose between the provider types AzureAD and AD FS. For our example, select the AzureAD type.
- Login Button Name
Choose a name for the login button that will be displayed to users on the login page, or in the SDC.
Please note that the name must not contain spaces and a maximum of 20 characters.
- Metadata document URI.
Enter the URI for the Metadata document here. You can get this from the AzureAD interface Endpoints.
- ClientID
Specify the ClientID here. This can be obtained from the AzureAD interface Endpoints.
- Group Claim
The Group Claim field can contain the claim you define to identify users so they can be assigned to an appropriate group. The Group Claim links the provider to the groups. In our example we have chosen the claim groups.
The value of the claim (e.g. the group ID: 1-2-3-4) is required for authentication and assignment to a group. The value of the claim is defined in the respective group into which the user is to be created or under whose guidelines the user is to act.
- Scopes
The scopes for the respective provider are automatically created by the system. No input is necessary here.
- Client Secret
The client secret is required to communicate with Outlook Add-in NG. This item is optional. If you want to use the Add-In, please also note the points from: Add-In NG Configuration.
- Convert Existing Accounts
If there are already user accounts (LOCAL or LDAP), these can be converted to OIDC accounts using the Convert Existing Accounts function.
Converting users detaches them from their old login procedures. For example, if a user is converted from LOCAL to OIDC, they will no longer be able to authenticate via the local route.
- Enforce login provider
If you want to force a specific login type, select the desired value here. If No is selected, the user can choose the login type himself. If one of the other fields is selected, the respective login type will be forced.
Assign a group
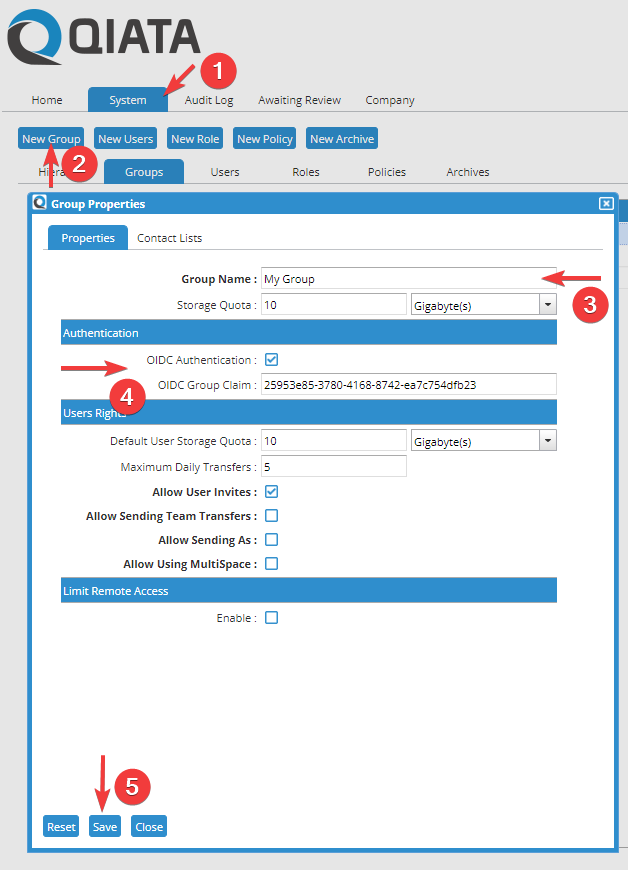
After the provider has been registered, the Group Claim value must be added to one or more groups. This is mandatory for the registration.
To do this, create a new group via System -> New Group. Choose a Group Name and activate the OIDC Authentication. After activation a new field appears for the input of the Group Claim. Now please insert here the value that was communicated via the provider. Our example is based on the group ID.
How to get the group ID in AzureAD
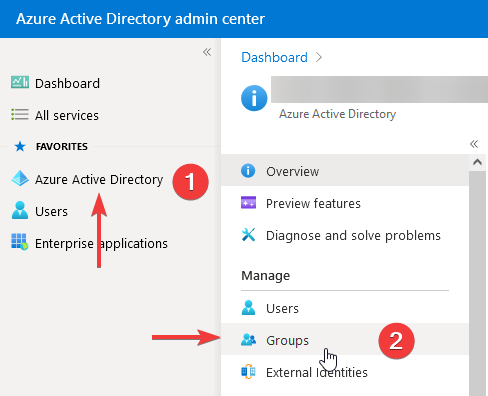
Log in to AzureAD and navigate to Groups.
Select the desired group in the Groups overview and click on the corresponding entry.
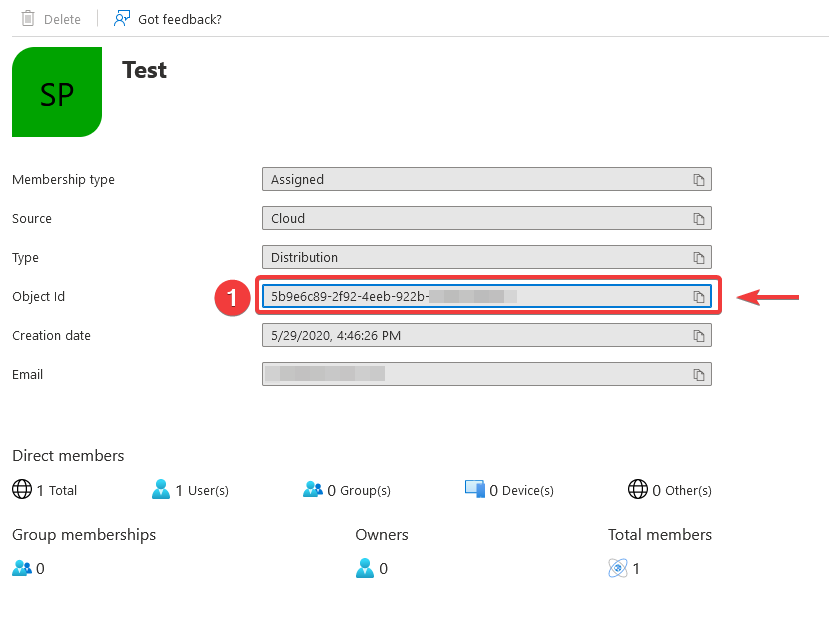
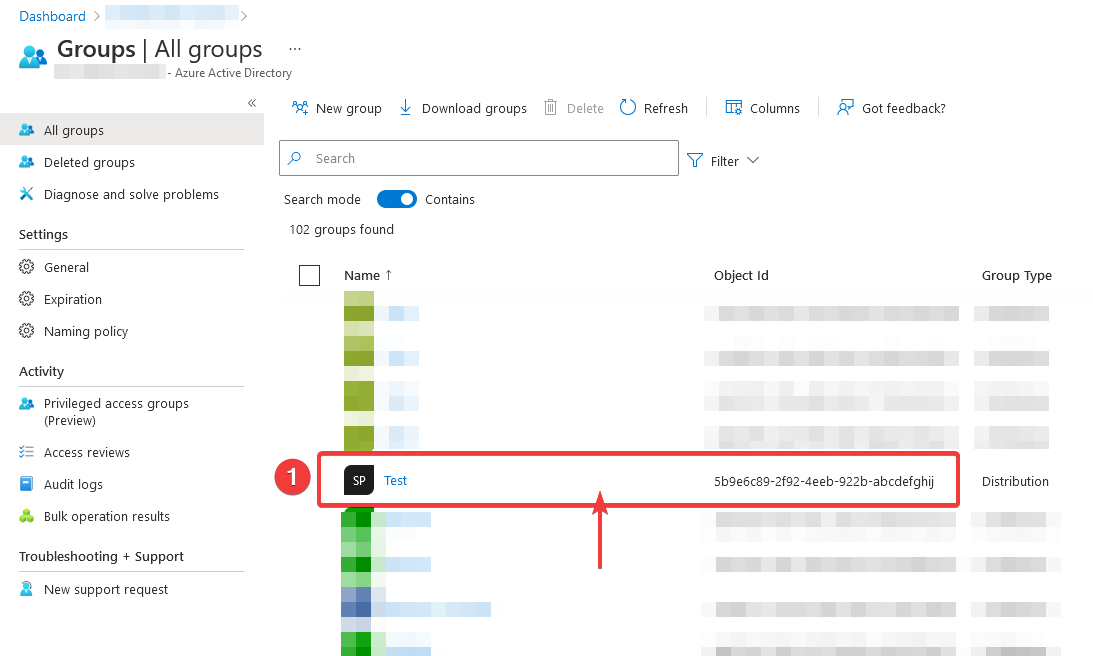
Copy the Object ID of the group and paste this ID into the Group Claim of the Qiata group.
Any user who now arrives at Qiata correctly authenticated with the Group Claim "14bc2de9-6521-40dd-ac04-a3cdd76bd343" will automatically be set up in the new group and thus subject to the group's policies.
Finally, click Save to save the group.
Please note that the LDAP Authentication and Automaticall Sign-Up Users functions are not compatible with OIDC Authentication.