Qiata User Guide
Use Qiata to send files and folders, request documents and collaborate in a shared TeamTransfer.
Available areas, storage limits and security settings depend on your license, permissions and organization's policies. Contact your administrator if a described feature is missing or a setting is locked. Colors, logos and email templates may differ from the illustrations. The images use fictional project files; information identifying other people is masked.
Choose the right workflow
| You want to … | Use … |
|---|---|
| Send files to other people | Transfer |
| Receive files from another person | Transfer Invite |
| Share a workspace, add files and work with versions | TeamTransfer |
| Store personal files for later use | PersonalSpace |
| Send existing transfer files again | Files |
For your first transfer: Sign in → New Transfer → Enter recipient and message → Add files → Review settings → Send now.
Sign in and sign out
Sign in with your Qiata or directory account
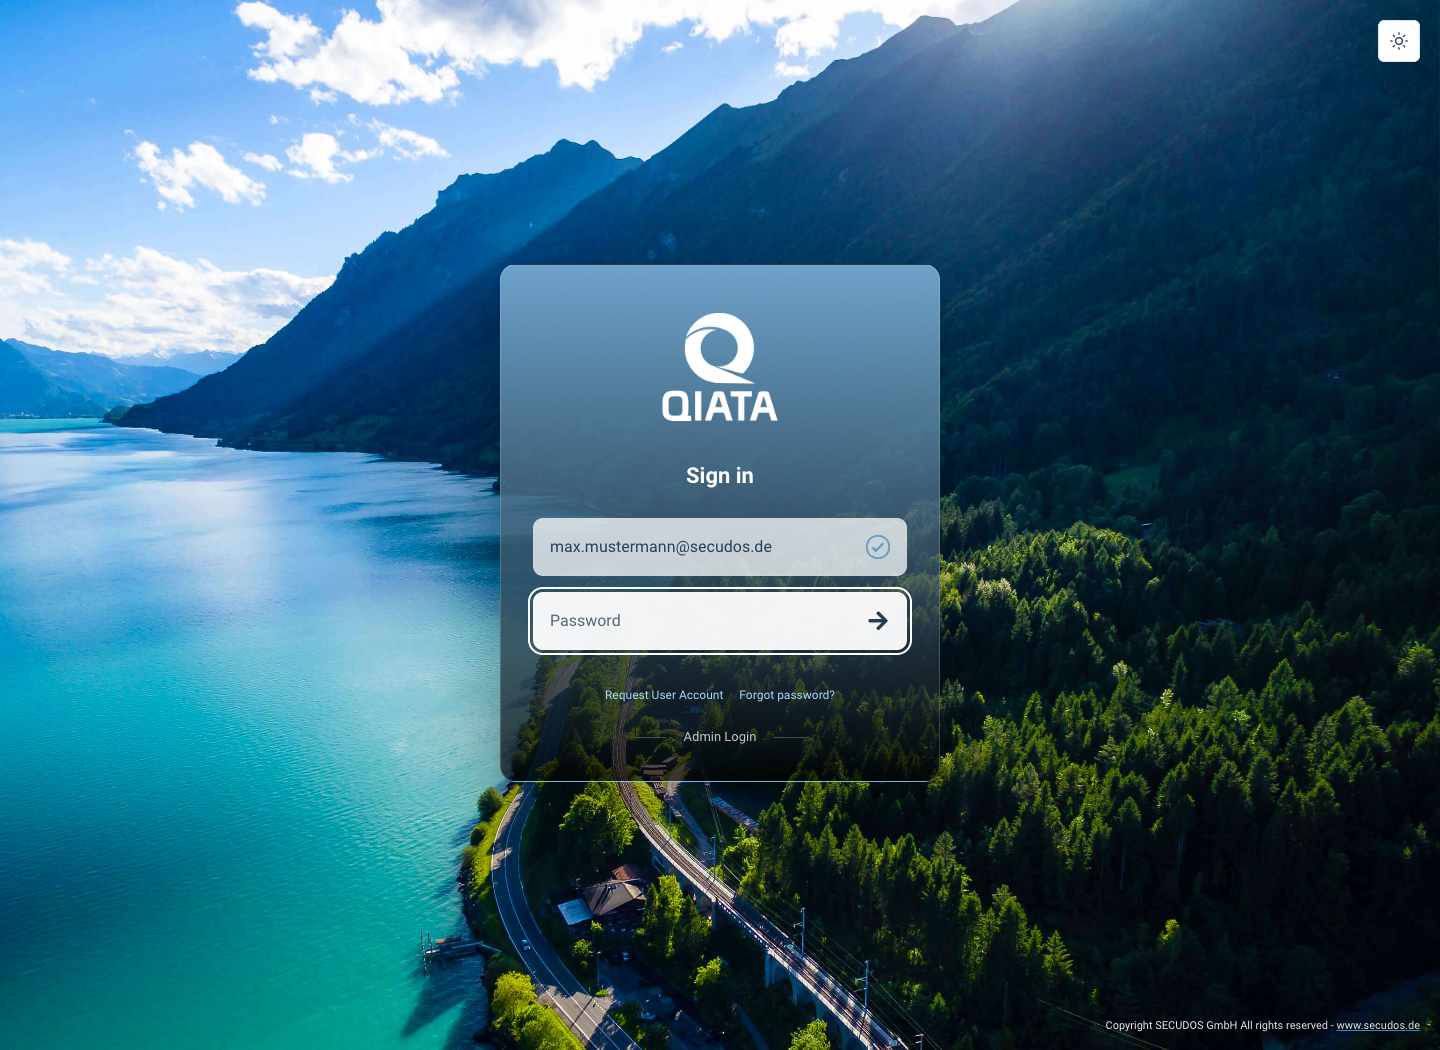
- Open your organization's Qiata sign-in page.
- Enter your email address and select the arrow to continue.
- Enter your password at the next step and confirm the sign-in.
- If your organization requires an additional factor, follow the extra authentication steps.
Use the credentials supplied by your organization. Ask your administrator if unsure. Administrators use Admin Login or the designated legacy administration entry point; administration features are not available in the regular new user interface.
Use the credentials provided by your organization. The example address shown in this guide is not a generally available account.

Sign in with Microsoft Entra ID, AzureAD or another provider
If external providers are enabled, they appear directly on the sign-in page under Or login with. Select your provider and sign in on its authentication page. An existing provider session may allow you to continue without entering another password.
Your configuration may also redirect you straight to a required provider. The normal sign-in workflow does not require a separate provider selection page.
Admin Login is intended for the administration area. Use the regular user sign-in for your day-to-day work.
Forgotten passwords and two-factor authentication
For a local Qiata account, Forgot password? starts the available recovery process. Accounts managed by an external directory or identity provider use that system's procedures. Contact your administrator if you are unsure.
Follow the detailed OTP instructions for setup, later sign-ins and recovery. Do not share setup keys, QR codes or backup codes.
Sign out and expired sessions
An existing session can allow you to return without signing in again for a period determined by your organization.
Use the sign-out icon when you have finished, particularly on a shared device.
Signing out of Qiata does not automatically sign you out of Microsoft or another external provider. That provider's existing session may therefore be reused when you sign in again.
If your Qiata session has expired, select Go to login page on the displayed page and sign in again. You may need to re-enter information that was not saved.
Find your way around
Use an up-to-date browser approved by your organization. File and folder functions also depend on its capabilities. Qiata supports German, English, French and Simplified Chinese. The browser language is used initially, with English as fallback; after sign-in, a saved user preference takes priority. A deliberate language change is saved for your account and persists beyond the session.
After signing in, the Dashboard shows information such as storage usage, your daily transfer limit, administrator announcements and your permissions. Select My Settings to open your personal defaults. Change Password is offered for local accounts; directory and provider accounts use their own procedures. Your administrator controls storage and transfer quotas.
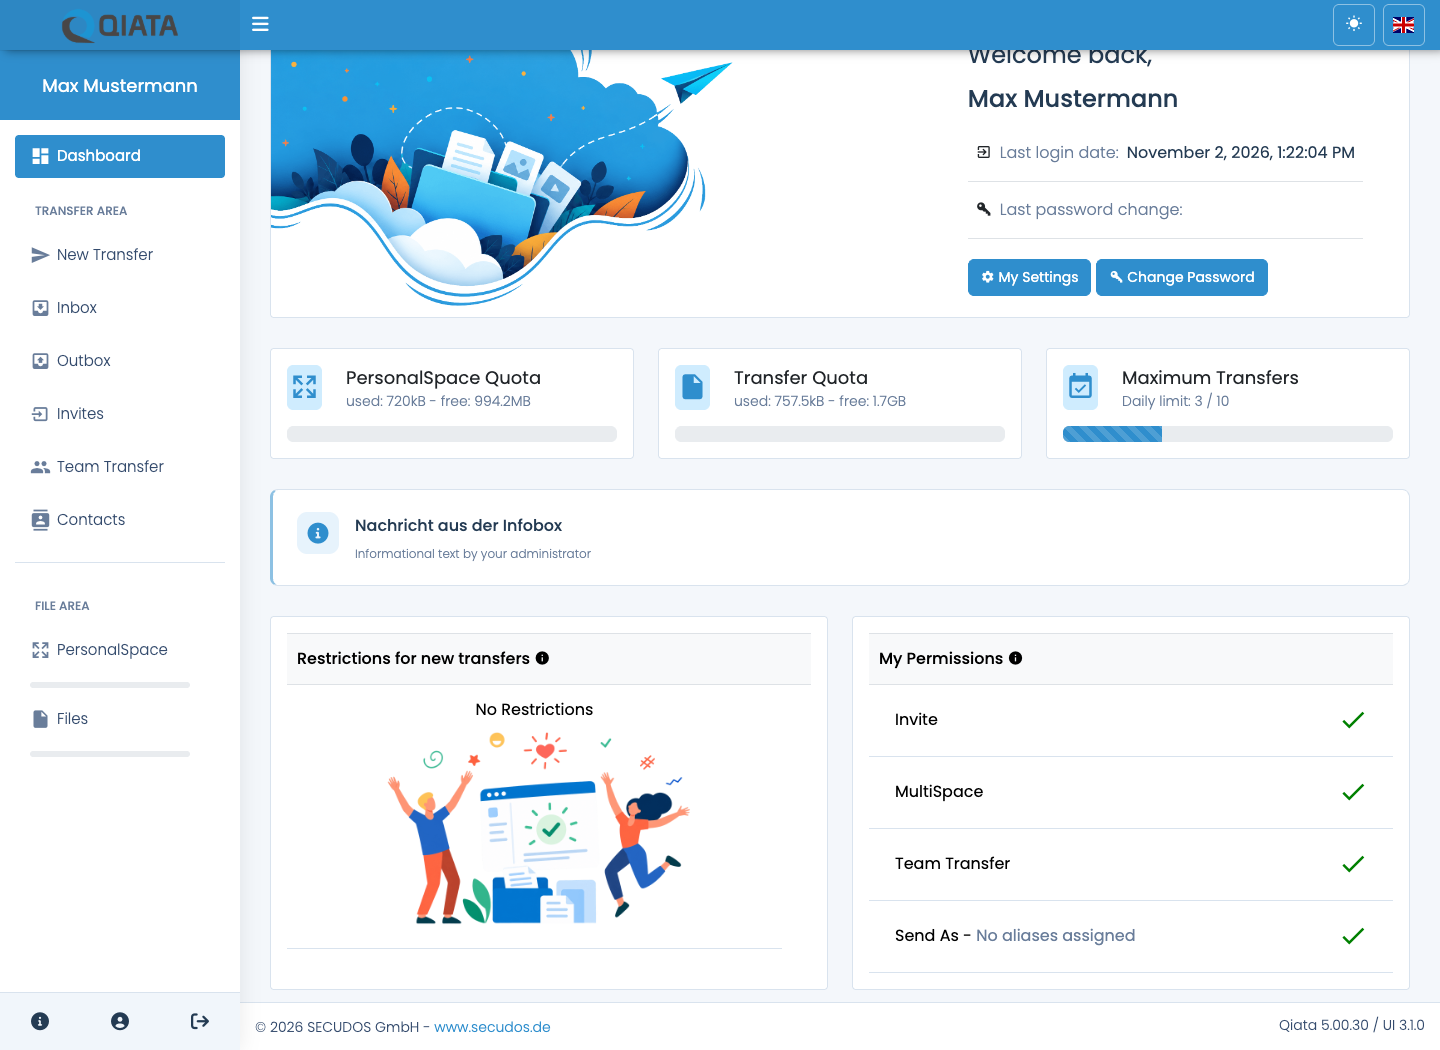
| Area | Purpose |
|---|---|
| New Transfer | Create a transfer, invitation or TeamTransfer |
| Inbox | Open transfers sent to you |
| Outbox | Manage your sent transfers and delivery information |
| Invites | Follow upload invitations and the resulting replies |
| Team Transfer | Open shared workspaces |
| Contacts | Manage contacts and contact lists |
| PersonalSpace | Access your personal file storage |
| Files | Find and reuse existing transfer files |
Collapse or expand navigation with the menu icon. Language selection and the light/dark mode switch are in the top bar. You can change the interface language while working.
Use search, filters and pagination to find an item in a transfer list. Refresh loads the current state. Selecting checkboxes is different from choosing Open: bulk actions apply to the selected entries.
Choose light or dark mode
Use the sun or moon Appearance icon in the top bar to change the interface. You can switch while working without signing in again.
- Open Appearance at the top right.
- Choose Light, Dark or System.
- The view changes immediately. A checkmark in the menu identifies your selection; the top-bar icon shows the light or dark appearance currently in use.
| Selection | Effect |
|---|---|
| Light | Keeps the light appearance regardless of the system setting. |
| Dark | Keeps the dark appearance regardless of the system setting. |
| System | Follows the light/dark preference reported by your operating system or browser and updates when that preference changes. |

Appearance selection is also available on supported sign-in and external transfer pages. Your organization's colors, logos and background images may differ from the example. Changing appearance does not change files, transfers or access rights.
Qiata stores the selection in this browser for this Qiata address. It is not synchronized across your account. Another browser, browser profile or device can use a different selection. Clearing website data or preventing persistent storage may return the selection to System.
Send a transfer
Enter recipients and a message
- Open New Transfer and select Transfer.
- Enter the recipient's email address, using an address from your own contacts. The address
john.doe@secudos.dein the images is an example only. Confirm the address and check the recipient list. - Add further recipients using the available address rows.
- Enter a useful subject and a message.
Matching contacts can be suggested as you type. Use + to add address rows. TO, CC and BCC work like email addressing; BCC is for concealed addressing. Select TO, CC or BCC as appropriate. Check the addresses before sending the transfer.
If additional sender addresses are available, a FROM selection is shown. Using a Send As address may also give other authorized group members access to the transaction. Follow your organization's rules for these addresses.
Add files and folders
Choose Add Files or Add Folders. Alternatively, drag files or folders into the displayed drop area. The integrated file manager appears after you select content.
You can add more files before sending. Review the selected contents, total size and file count. Removing an unsent local file from the selection does not delete the original from your computer.

When selecting a folder, your browser may ask you to confirm access to its files. Review and confirm the selection so that Qiata can include them. Available selection options depend on your browser and device.
Select an email template
If several email templates are available for the selected transfer type, you can choose another template. The template controls the notification's presentation. You still enter the subject and message in the transfer form.
Select Default for the standard template. Ask your administrator if you need more templates. Transfers, invitations and TeamTransfers may have different templates. Your administrator manages the central templates, logos, colors and footer information.

Upload and finish
- Review the transfer settings.
- Select Send now.
- Keep the browser window open while the upload is running.
- Wait for the success message and close the completion dialog.
Use Cancel to stop an upload and return to the selection. Review the retained fields and attachments before trying again. Once complete, Close only closes the dialog; pause a sent transfer through On hold in the outbox if necessary.
Qiata shows progress during the upload. Displayed speed and remaining time are estimates and may fluctuate. A dash may be displayed until enough measurements are available. The completion summary allows you to check the transferred contents and elapsed time.
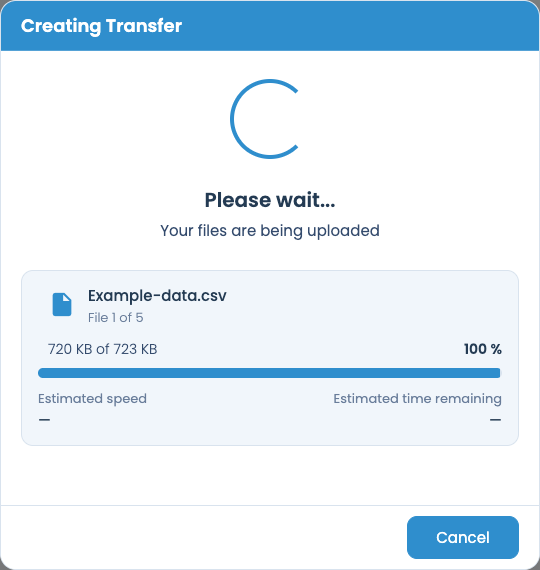

Files already available in Qiata do not need to be uploaded from your computer again. A successful upload does not mean that a recipient has downloaded the files. Follow subsequent processing and recipient activity in the Outbox.
Reset discards the entries in the creation form. It does not recall an already sent transfer.
Set validity, download limits and protection
Open Change settings in the creation form. Available values depend on the transfer type and your organization's requirements.
| Setting | Meaning |
|---|---|
| Expiry Date | How long the transaction remains available |
| Delayed / Delivery Date | Schedule a later delivery, where available |
| Maximum Downloads | Limit the permitted number of downloads |
| Maximum Uploads | Limit the permitted uploads for an invitation |
| PIN required | Protect access with an additional PIN |
| Password required | Require the recipient to authenticate |
Choose dates with the calendar or enter the offered format. Enable Delayed before setting a later delivery time. Default validity comes from your account settings and is not identical for every user. The delivery date must be earlier than the expiry date. Values enforced by your administrator cannot be overridden by entering a higher limit.

Use the dice icon to generate a PIN where offered. Your administrator can require a minimum length, digits, uppercase letters and special characters. A PIN is an additional secret for accessing the transaction. Share it with the intended recipient through a separate, suitable communication channel. Do not confuse a transfer PIN with your own Qiata password. Observe the displayed length and character requirements.
Some settings can be changed after creation if your role permits it. Save these changes explicitly with Save changes in the relevant dialog.
Get to know the file manager
The file manager is the central file and folder view used when creating transfers, in PersonalSpace, under Files and in TeamTransfer. This example shows a transfer being assembled. The numbered markers identify the controls; additional actions depend on the area.
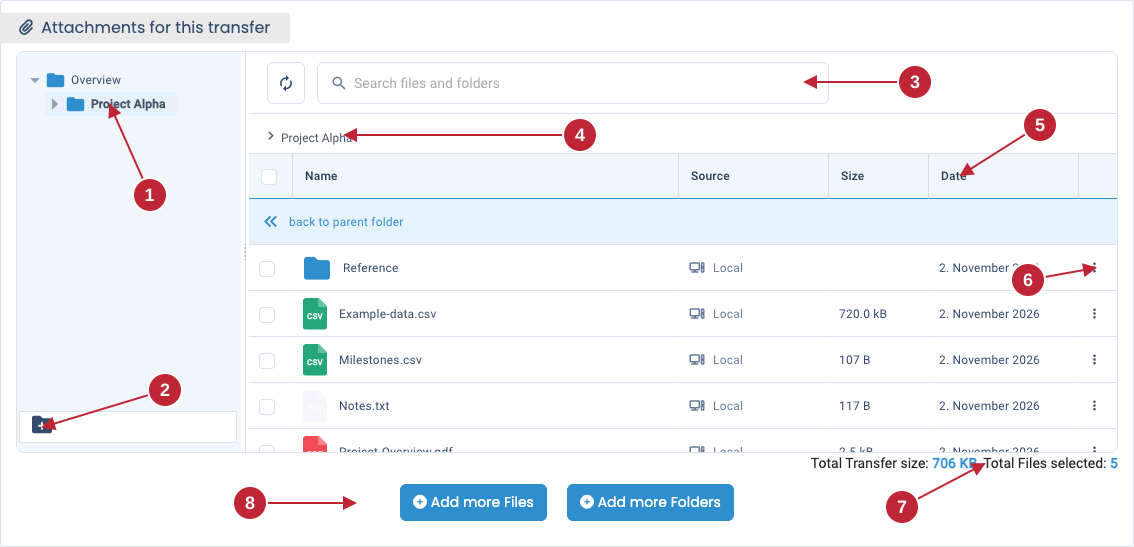
| No. | Area | How to use it |
|---|---|---|
| 1 | Folder tree | Expand folders with the small arrow. Select a folder to display its contents on the right. Overview is the organizational root of the selection; it is not sent as an extra folder. |
| 2 | New Folder | Create a folder in the current location. Enter a name and confirm the dialog. |
| 3 | Search and refresh | Search for file and folder names. Clear the search text to return to the normal view. The circular arrow reloads the current state. |
| 4 | Folder path and parent folder | The path above the list shows your location. Double-click a folder to open it; Back or .. returns to its parent. |
| 5 | Columns and views | Select an available column header to sort by name, size or date. Use the view selector to switch between the available layouts. |
| 6 | Selection and context menu | Select items using the checkboxes. Open the action menu with a right-click or the three dots beside an item. Actions apply to the selected items. |
| 7 | Size and count | Below the selection, check the total transfer size and selected file count. These values update as you change the contents. |
| 8 | More files and folders | Add content using the two buttons. Add Files opens a file picker; use the folder button for complete folders where the browser supports it. |
During transfer creation, you are editing an unsent selection. In TeamTransfer, file actions change the shared workspace. Files and PersonalSpace offer their own actions. Available context-menu options also depend on file type, single or multiple selection and your permissions.
Select, move and add more items
Where supported, use Ctrl + click, Shift + click or Ctrl + A for multiple selection; use the corresponding Command key on a Mac. Ensure that the file manager has focus. You can also select several files in the operating system's file picker.
Depending on the area, the context menu can include:
| Action | Effect |
|---|---|
| Copy / Cut / Paste | Prepare items for copying or moving, then paste them in the destination folder where supported |
| Rename | Change the selected item's name |
| Delete | Remove the selection; check the confirmation and the affected area |
| Download / Download as ZIP | Save a file or an available selection or folder |
| Preview / Show PDF | View content; note the important difference in download counting below |
| Versions | Inspect earlier file versions in TeamTransfer |
| Send as New | Carry existing content into a new transfer |
Before sending, you can also drag local files or folders into the file manager's drop area. Check the current folder first: the new items are added at that location.
A transfer can combine local files, PersonalSpace content and existing transfer files. After switching between areas, review the complete selection in New Transfer.
Removing a local file from an unsent draft does not delete the original from your computer. Deleting in PersonalSpace or TeamTransfer affects the content stored in that area.
Distinguish previews from the PDF viewer
The eye icon opens an image preview of a supported file. This does not download the original or increase its download counter. The file manager's information icon opens or closes the details panel, which can show properties, previews and additional tabs for the selected item.
Normal server-generated previews are unavailable when file encryption is enabled. A missing preview does not necessarily mean the file is damaged. The PDF viewer is a separate feature and requires the relevant download rights.
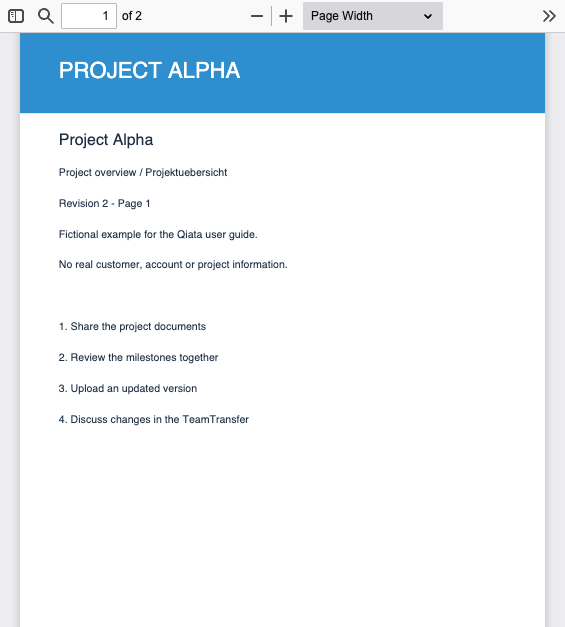
Show PDF downloads the original for the PDF viewer. Opening it is recorded in history and the download counter, and can consume the available download allowance. This differs from an image preview. Saving from the already open viewer does not create another Qiata download merely because you select its save control.
Use the viewer's arrows or page field to change pages, its magnifying glass to search for text, and the plus/minus controls or selector to change zoom. Depending on the viewer, printing, saving, rotation and additional layouts are also available. Text search requires a searchable text layer; it cannot find text stored only as an image. Select Close PDF or the close icon to return.
Your browser settings determine whether you are asked for a destination or files are saved automatically. Starting a Qiata download does not change those settings.
Transfer details using the outbox example
The Inbox contains transfers addressed to you; the Outbox contains those you have sent. Use search and pagination to narrow the list, and Refresh to reload it. Completion in the outbox describes recipient activity and differs from the upload progress shown during creation.
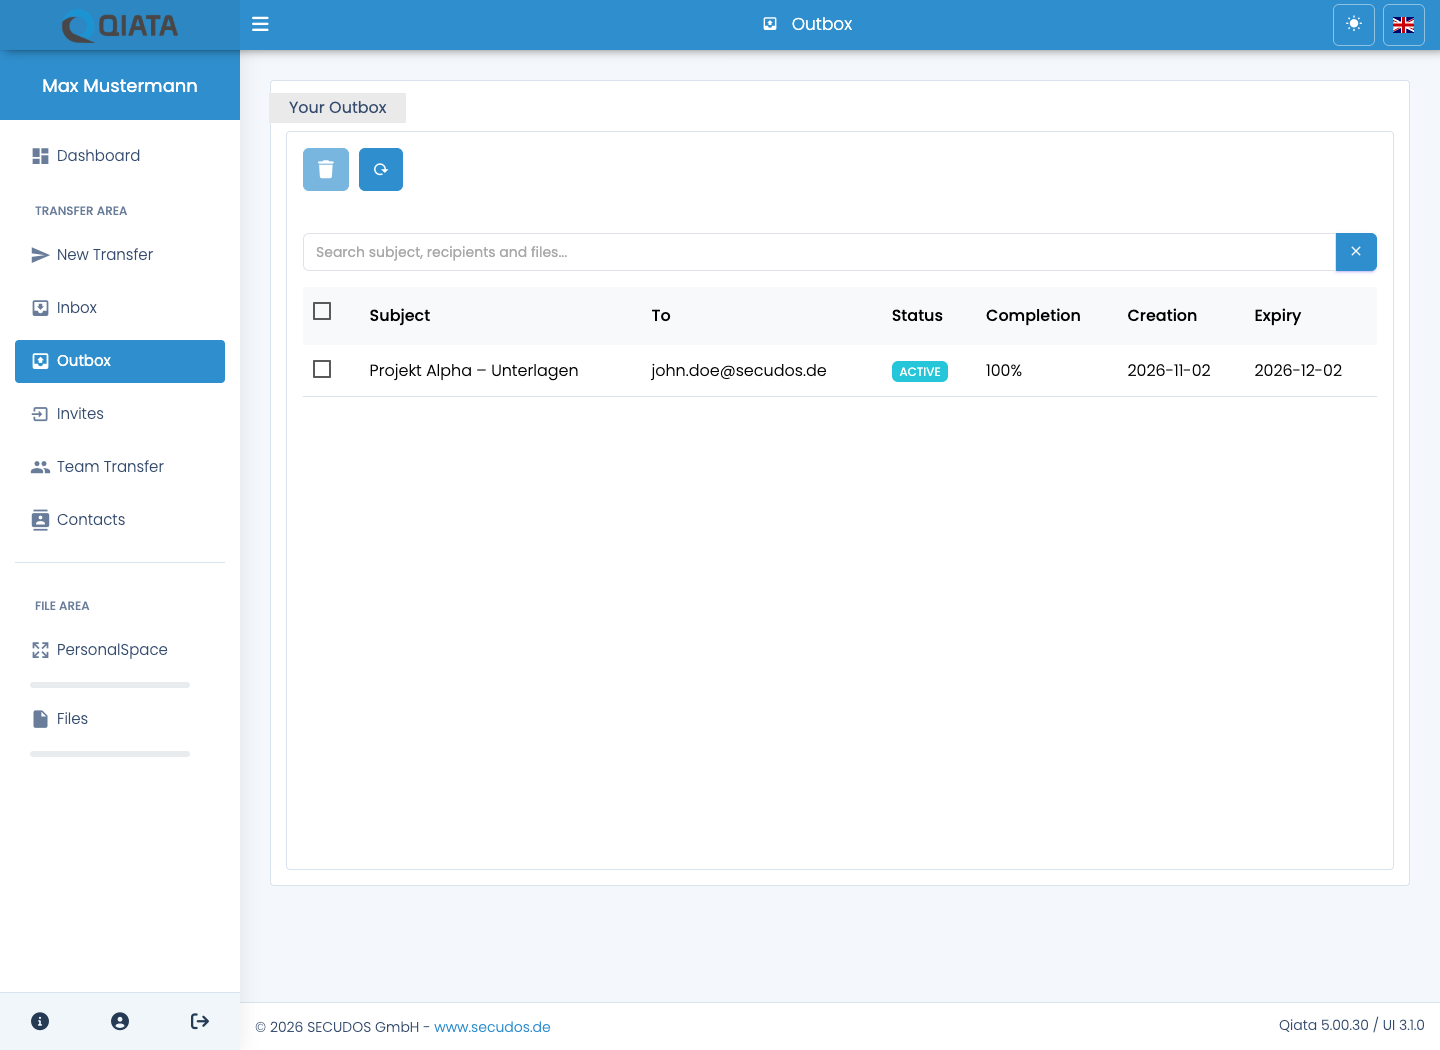
Transfers sent using a Send As address appear in the outboxes of all members of the associated group. Group members can therefore access these transfers and continue working with them. These transfers are marked with a blue (i) in the outbox.
Colors of information icons
The colored icons beside a subject provide additional information. They are separate from status badges such as ACTIVE, EXPIRED or ON HOLD. Hover over an icon or tap it to read its explanation.
| Icon | Meaning | What to do |
|---|---|---|
| Blue (i) | The transfer was sent using a Send As address. It appears in the outboxes of all members of the associated group. | Check the sender and responsibility for the transaction. This is not an error. |
| Gray (i) | The transfer resulted from an invitation. The tooltip identifies the associated transaction. | Inspect the invitation and its Transfers tab to see the connection. |
| Red exclamation mark | Errors have been recorded for the transfer. This does not mean every file or subsequent access failed. | Open History and inspect the event and time. A TeamTransfer error indicator opens history filtered to errors. |
An (i) beside a file's download count serves a different purpose: it opens that file's download information when records are available. It is not another transfer status. The file manager's information icon simply opens its details panel.
Open the details
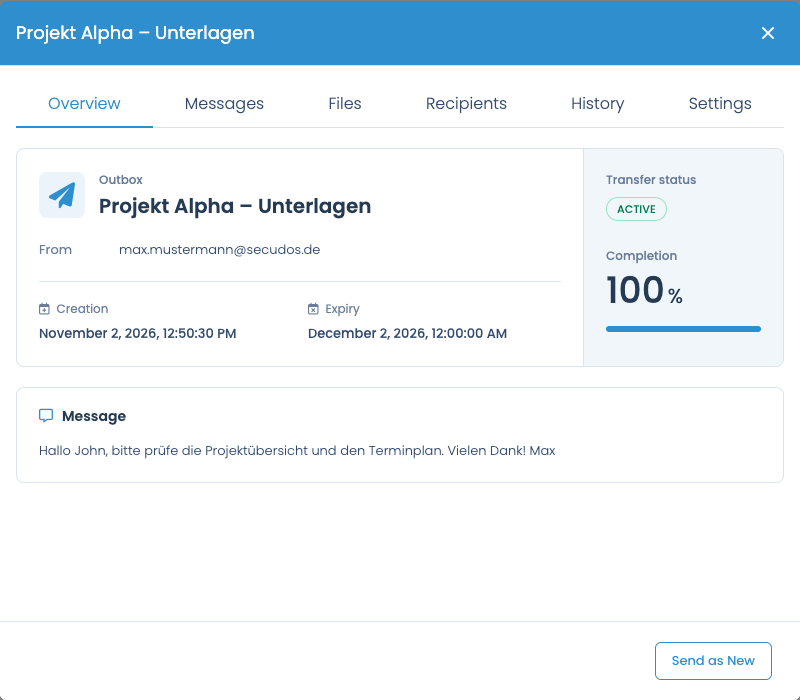
Choose Open or the subject. Selecting an information column may open the corresponding tab directly: for example, To opens recipients and the creation date opens history. The descriptions and images below show the Outbox modal. The same controls also apply to Inbox and Invites, with available tabs and actions depending on the transaction and your role.
Overview
Overview summarizes the sender, subject, original message, creation and expiry dates, status and recipient completion. A Send As address is shown where applicable. Successful sending or notification is not the same as a completed download. Authorized users can select Send as New to carry the files into a separate new transfer; this does not extend the original recipient list.
Messages
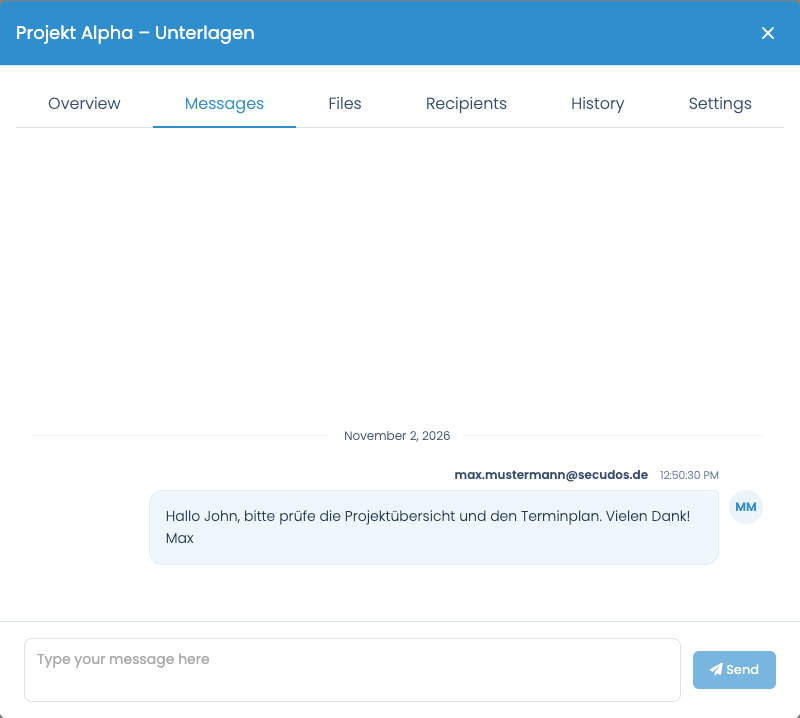
Messages shows the conversation with the participants. Your messages can be distinguished from those written by others. Enter a new message in the text field and use the offered send action. Check the transaction first. Conversation messages are separate from the original transfer message; available notifications depend on the settings.
Files and download information
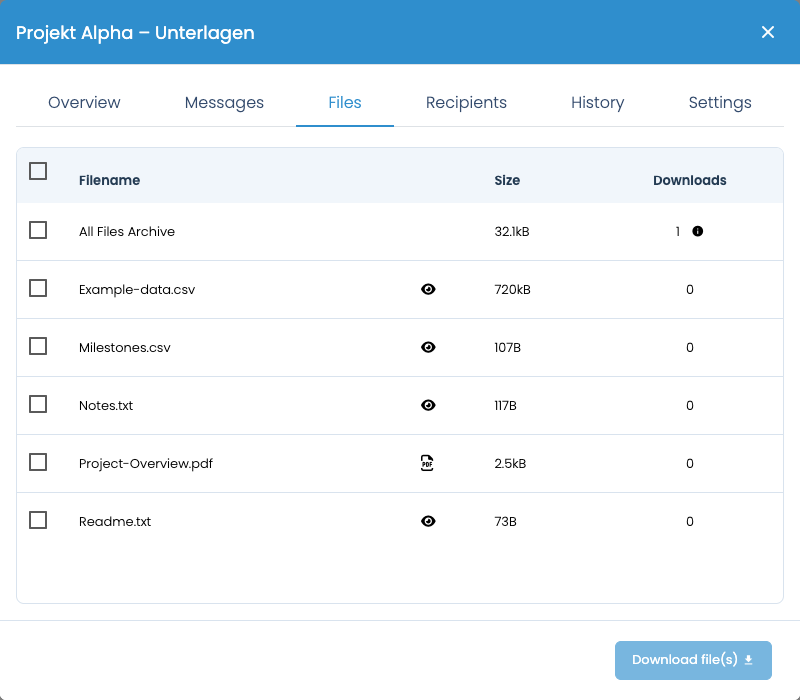
Files shows the sent content, sizes and download counts. Select the required files and start the download. Preview and PDF icons appear for supported types; observe the notes on encryption and PDF download counting. The (i) beside an existing download count opens information about who downloaded, when and with what progress. This is more detailed than an overall completion percentage.
Recipients
Recipients shows addressing type (TO, CC, BCC), identity, allowed downloads and available actions. An authorized sender can change the download limit, remind a recipient or open Advanced Options. Depending on the transaction, these include automatic notifications, the personal recipient link and removing the recipient.
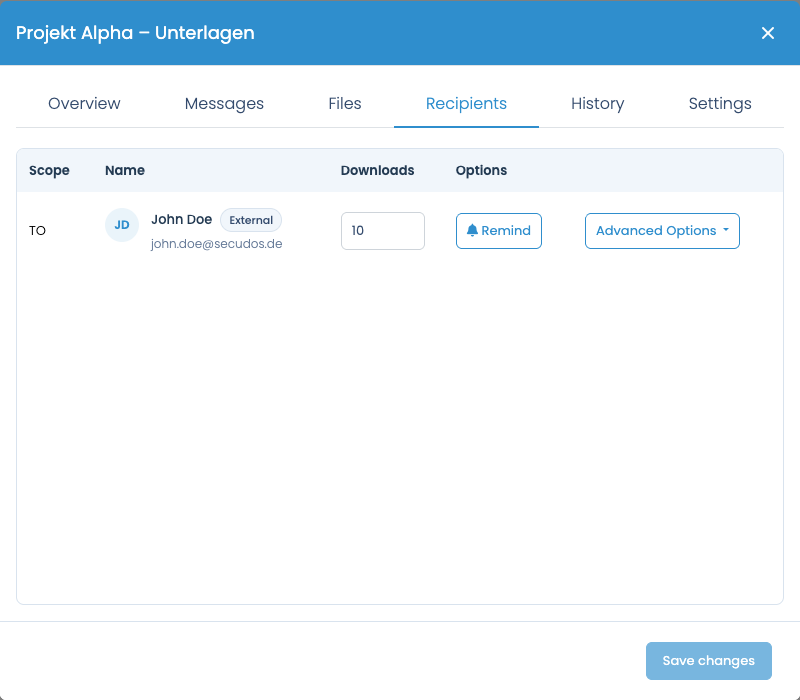
A reminder may send another email. A recipient link is intended for that person and must not be included in public messages or screenshots. Removing one recipient is different from deleting the entire transfer.
History
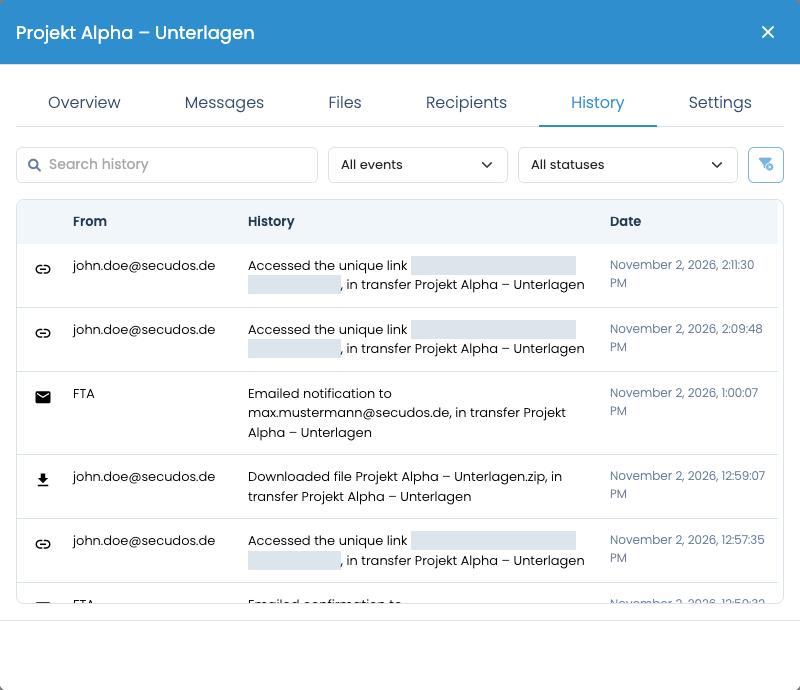
History records sending, changes, file actions and recipient activity. Use search and the event-type and result filters to find downloads or failures. A red exclamation mark in the list refers to errors recorded here.
Settings
In Settings, inspect the status and change permitted values such as On hold, Expiry Date or PIN Code. An expired or paused transaction cannot be used by recipients in the same way as an active one. Check the resulting state after saving.
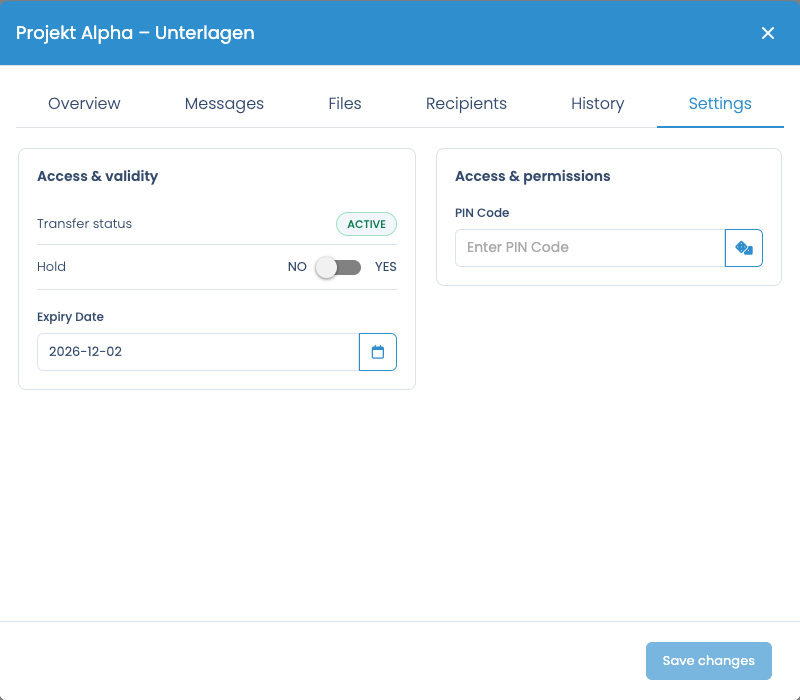
When Save changes becomes available, use it to apply your edits. Changing tabs or closing the modal does not replace saving. This applies particularly to recipient limits, notifications and transfer settings.
Request files with an invitation
A Transfer Invite allows another person to provide files to you through Qiata. You do not select attachments when creating the invitation.
Create an invitation
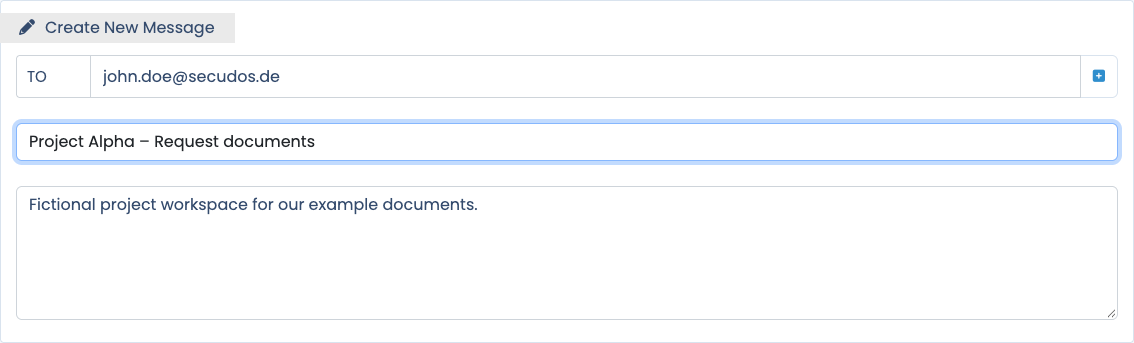
- Open New Transfer and select Transfer Invite.
- Enter the recipient, subject and message.
- Review the email template, expiry date, maximum uploads and protection settings.
- Select Send now.
Where offered, the REPLYTO recipient type specifies additional recipients for the resulting reply transfer. They receive that transfer as CC recipients. Distinguish these from the person you are inviting to upload.
Provide files as an invited person
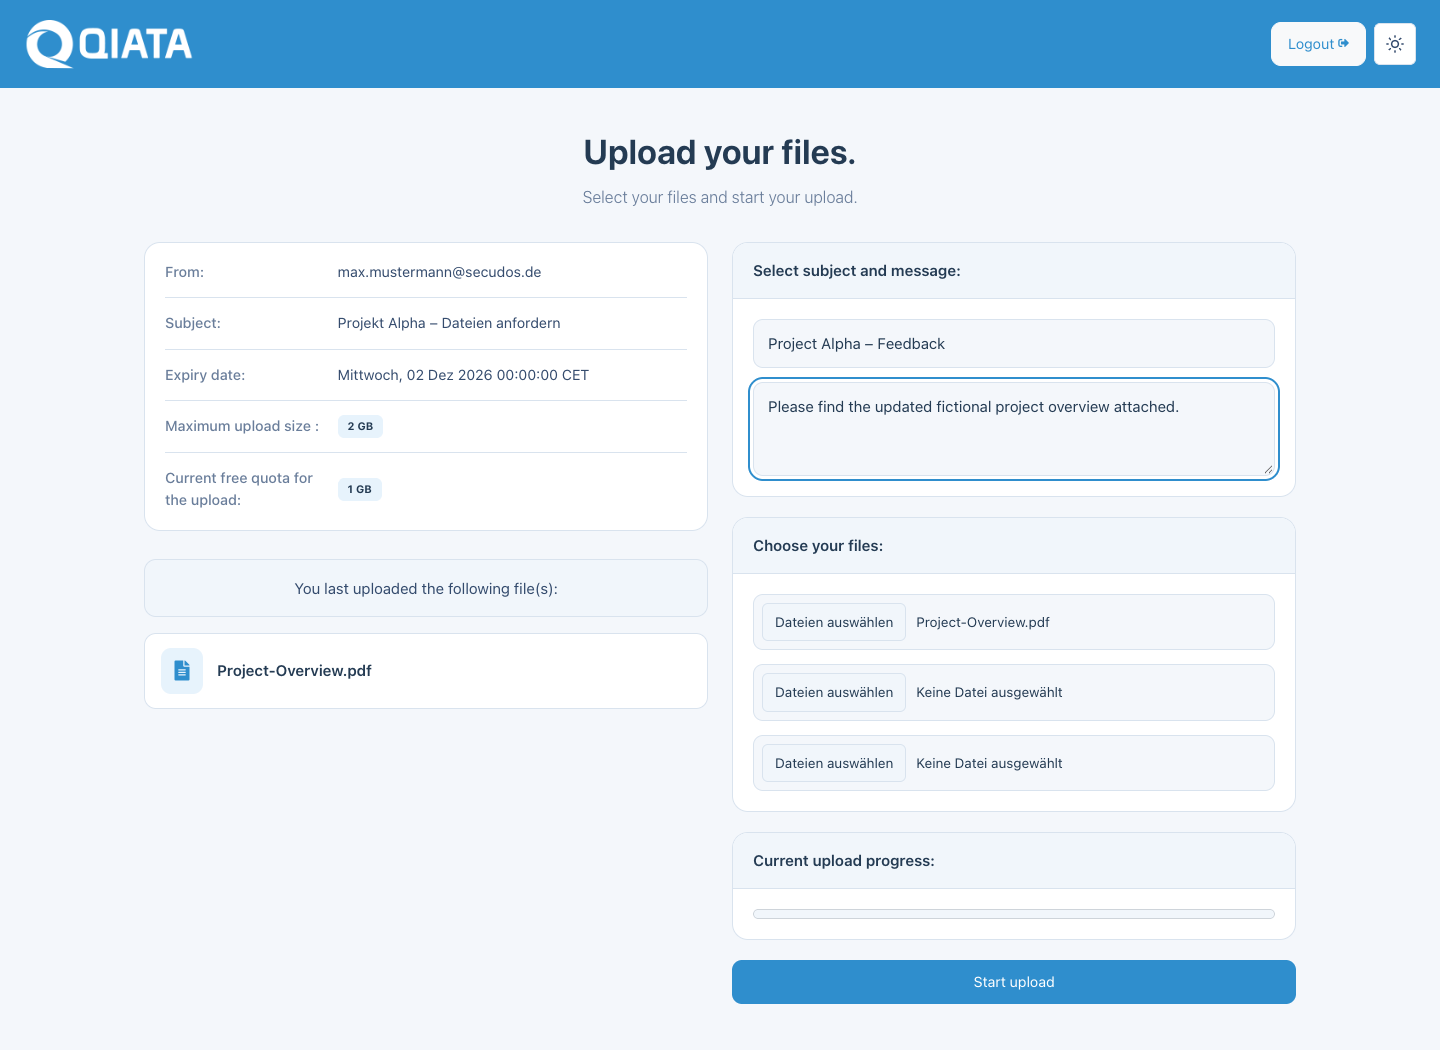
- Open the invitation from your notification.
- Authenticate or enter a requested PIN.
- Select the files to provide using the available file fields, then complete the subject and message.
- Start the upload and wait for confirmation.
The invitation provides access to submit files. The uploaded contents form the actual reply. Access can be limited by the invitation's validity and remaining uploads.
Follow invitation replies
Open Invites and the relevant transaction. The Transfers tab lists the actual reply transfers. Use Show transfer to open a reply in your inbox. Sending an invitation alone does not mean that files have been uploaded.
For invitations, available recipient limits control uploads; for ordinary transfers they control downloads. The invitation itself has no attachments. Shared details controls are explained using the outbox example.
Collaborate in a TeamTransfer
TeamTransfer requires the corresponding license option and your organization's permission. Members and read-only participants have fewer management options than the owner.
A TeamTransfer is a shared workspace. Members access the same file and folder structure. Authorized people can add files, provide new versions and discuss the contents.
Create and open a TeamTransfer
- In New Transfer, select Team Transfer.
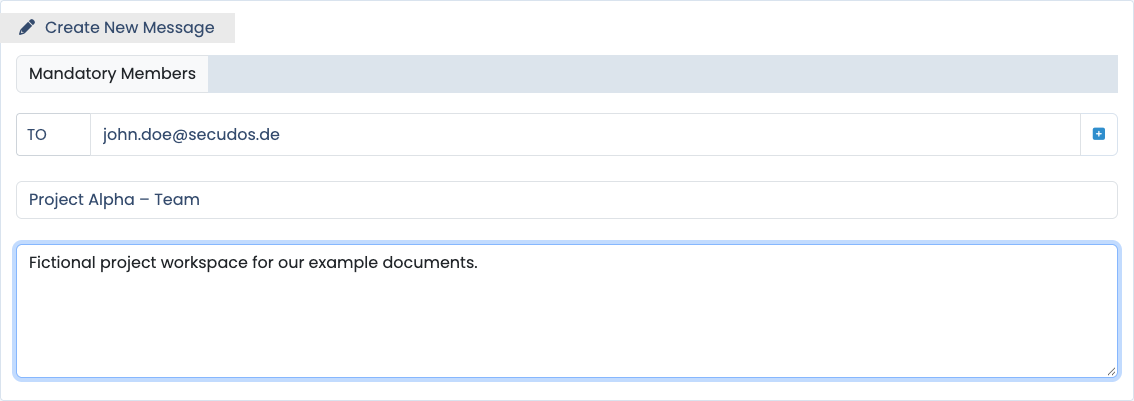
- Enter members, subject and message. Use additional address rows of type READ for members who should have read-only access.
- Add the initial files and review the settings.
- Select Send now.
- Go to Team Transfer and choose Open for the transaction to enter the shared file area. Clicking the subject or another information column opens the corresponding management view.
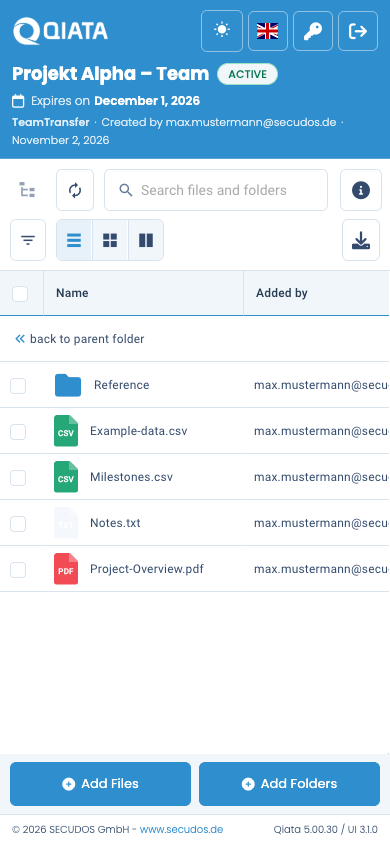
The workspace header shows its title, status and validity. The file manager is the main working area. Manage transfer opens additional details, members, messages, history and settings.
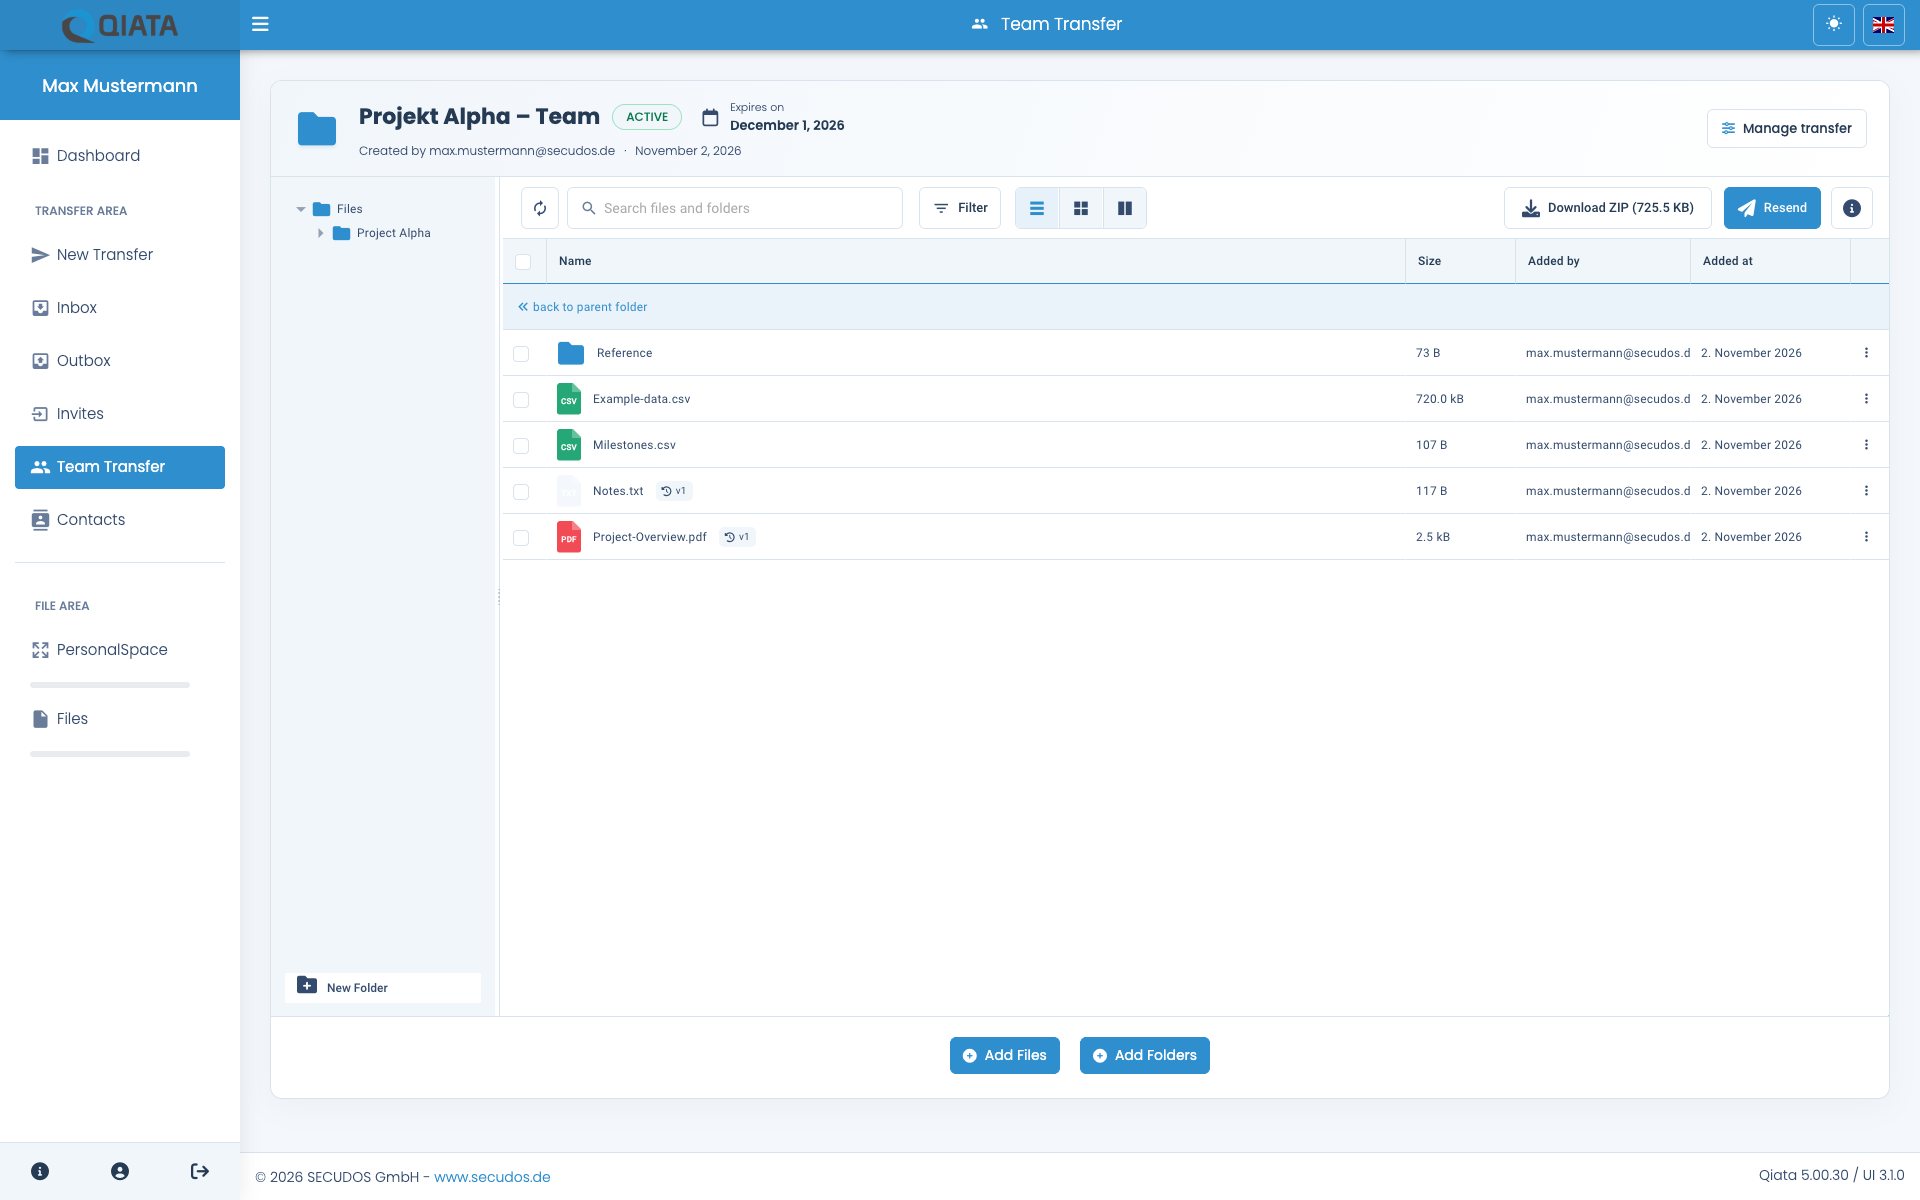
Set folder permissions during creation
- Enter the team members and add at least one folder containing files. The feature is not offered without members or folders.
- Open Folder permissions in the file manager.
- Under Permissions for, select the member whose access you want to configure. The owner retains management rights and is not restricted here in the same way as an ordinary member.
- Expand the folder tree and choose No access, Read or Read and write for each folder. Subfolders also offer Inherit permission.
- Close the dialog, review the other members and send the TeamTransfer only after checking the complete setup.
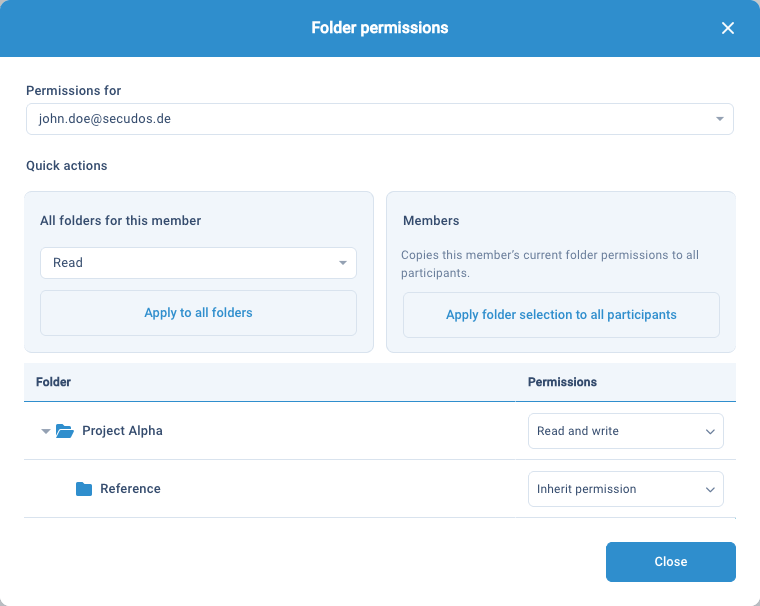
Read allows viewing and downloading shared content. Read and write additionally permits the available upload and folder actions. No access blocks the folder and its contents. Inherit permission uses the effective setting of the parent folder. A blocked parent cannot be bypassed by granting access to a child folder; these child settings are shown as locked.
The Apply to all folders quick action applies the selected permission to every folder for the currently selected member. Apply folder selection to all participants copies that member's current folder selection to the other participants. Use these bulk actions only when the settings should apply to every affected folder or person.
During creation, folder permissions are prepared in the draft and applied when you choose Send now. Closing this dialog does not create a TeamTransfer. In an existing workspace, folder access is changed directly on the selected folder. A member added as READ or read-only does not gain additional global write rights through a folder setting.
Owners, members and mandatory members
The Owner has a distinct visual marker and can use the available management and permission controls. Other members receive the rights assigned to them.
A Mandatory member is highlighted as a required participant. Discuss changes to such organizational requirements with your administrator.
Read Only Access restricts a member across the entire TeamTransfer. Write access to a folder does not override that overall restriction. Notifications and access rights are separate settings: switching off email notifications does not by itself remove file access.
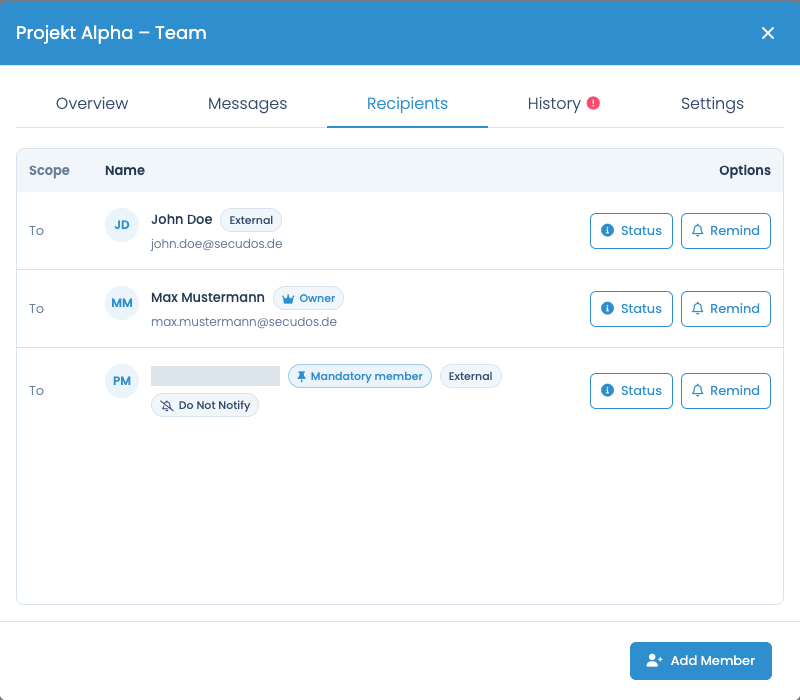
Add and manage members
Use Add Member if your role permits it. Check the address, access and notification options and any available folder assignments.
Choose a member's Status action to inspect link usage, last sign-in and notification, and available permissions. Do Not Notify suppresses further emails; Send A Reminder schedules a notification with date and time. Read Only restricts writing. Save any changes explicitly.
The recipient/member view provides activity information and available actions. These may include reminders, removing a membership or transferring ownership to an eligible internal member.
Transferring ownership changes your own management rights. Check the selected member and confirmation dialog carefully. Do not use this action merely to let another person participate in a project.
Check folder permissions
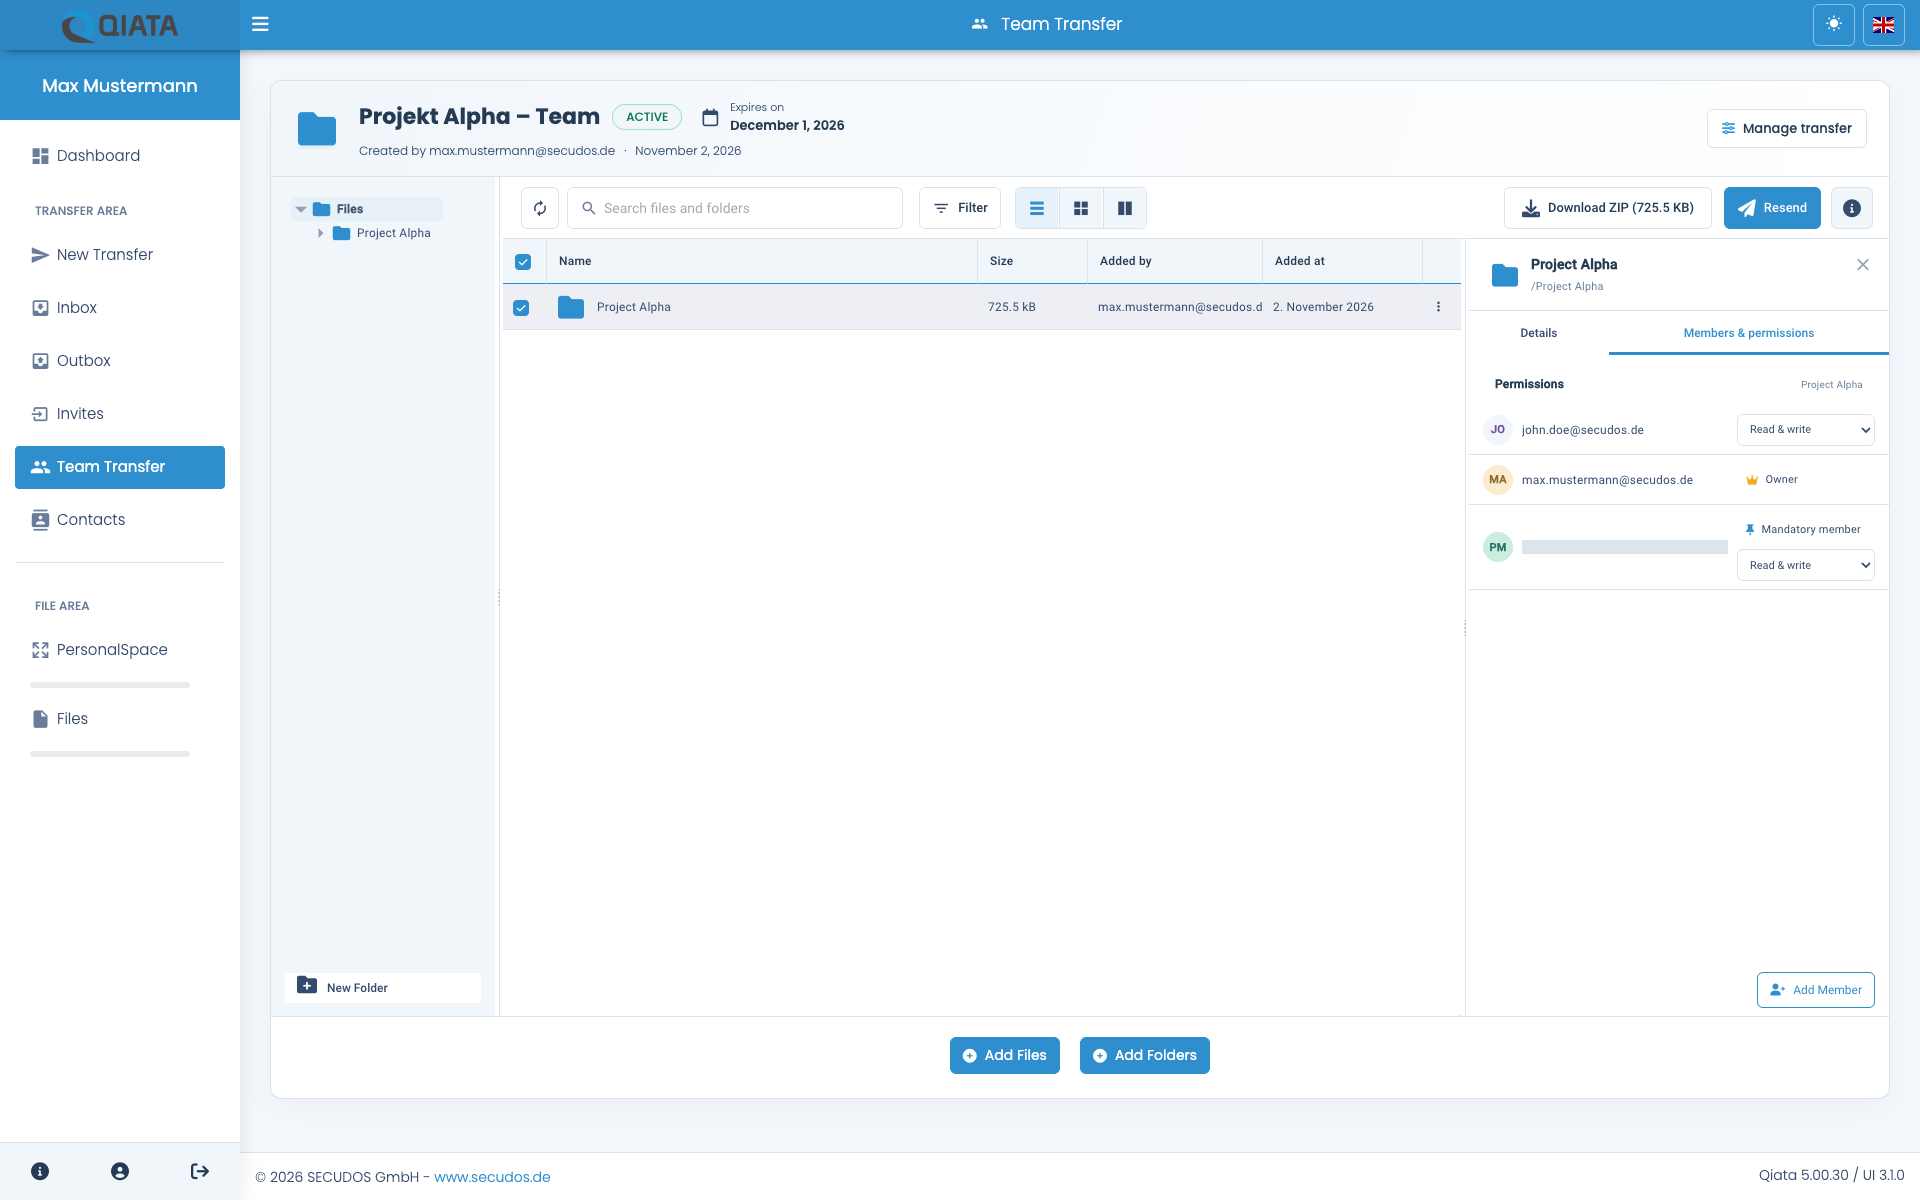
Select a subfolder and open the members or permissions view in the details panel. An authorized owner can choose No access, Read or Read & write where editing is available.
Observe overall rights and displayed inheritance. Check the effective access after making a change. Changes in the direct permission selector are saved immediately. This differs from editing the management dialog, where changes are applied with Save changes.
Add files and inspect versions
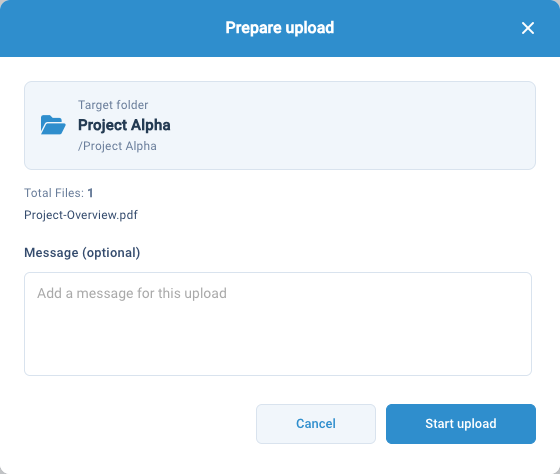
Open the required destination folder and select the files. In Prepare upload, check the destination and optionally add a message. Select Start upload to begin transferring the files.
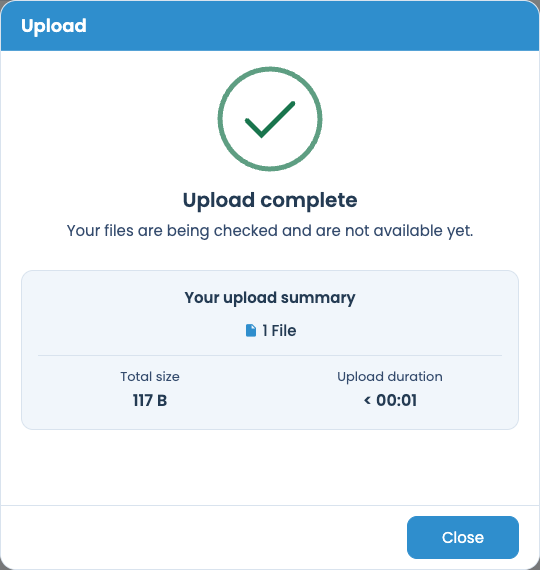
Upload complete can mean that files are still being checked and are not yet available. Wait for processing to finish, then refresh the view.
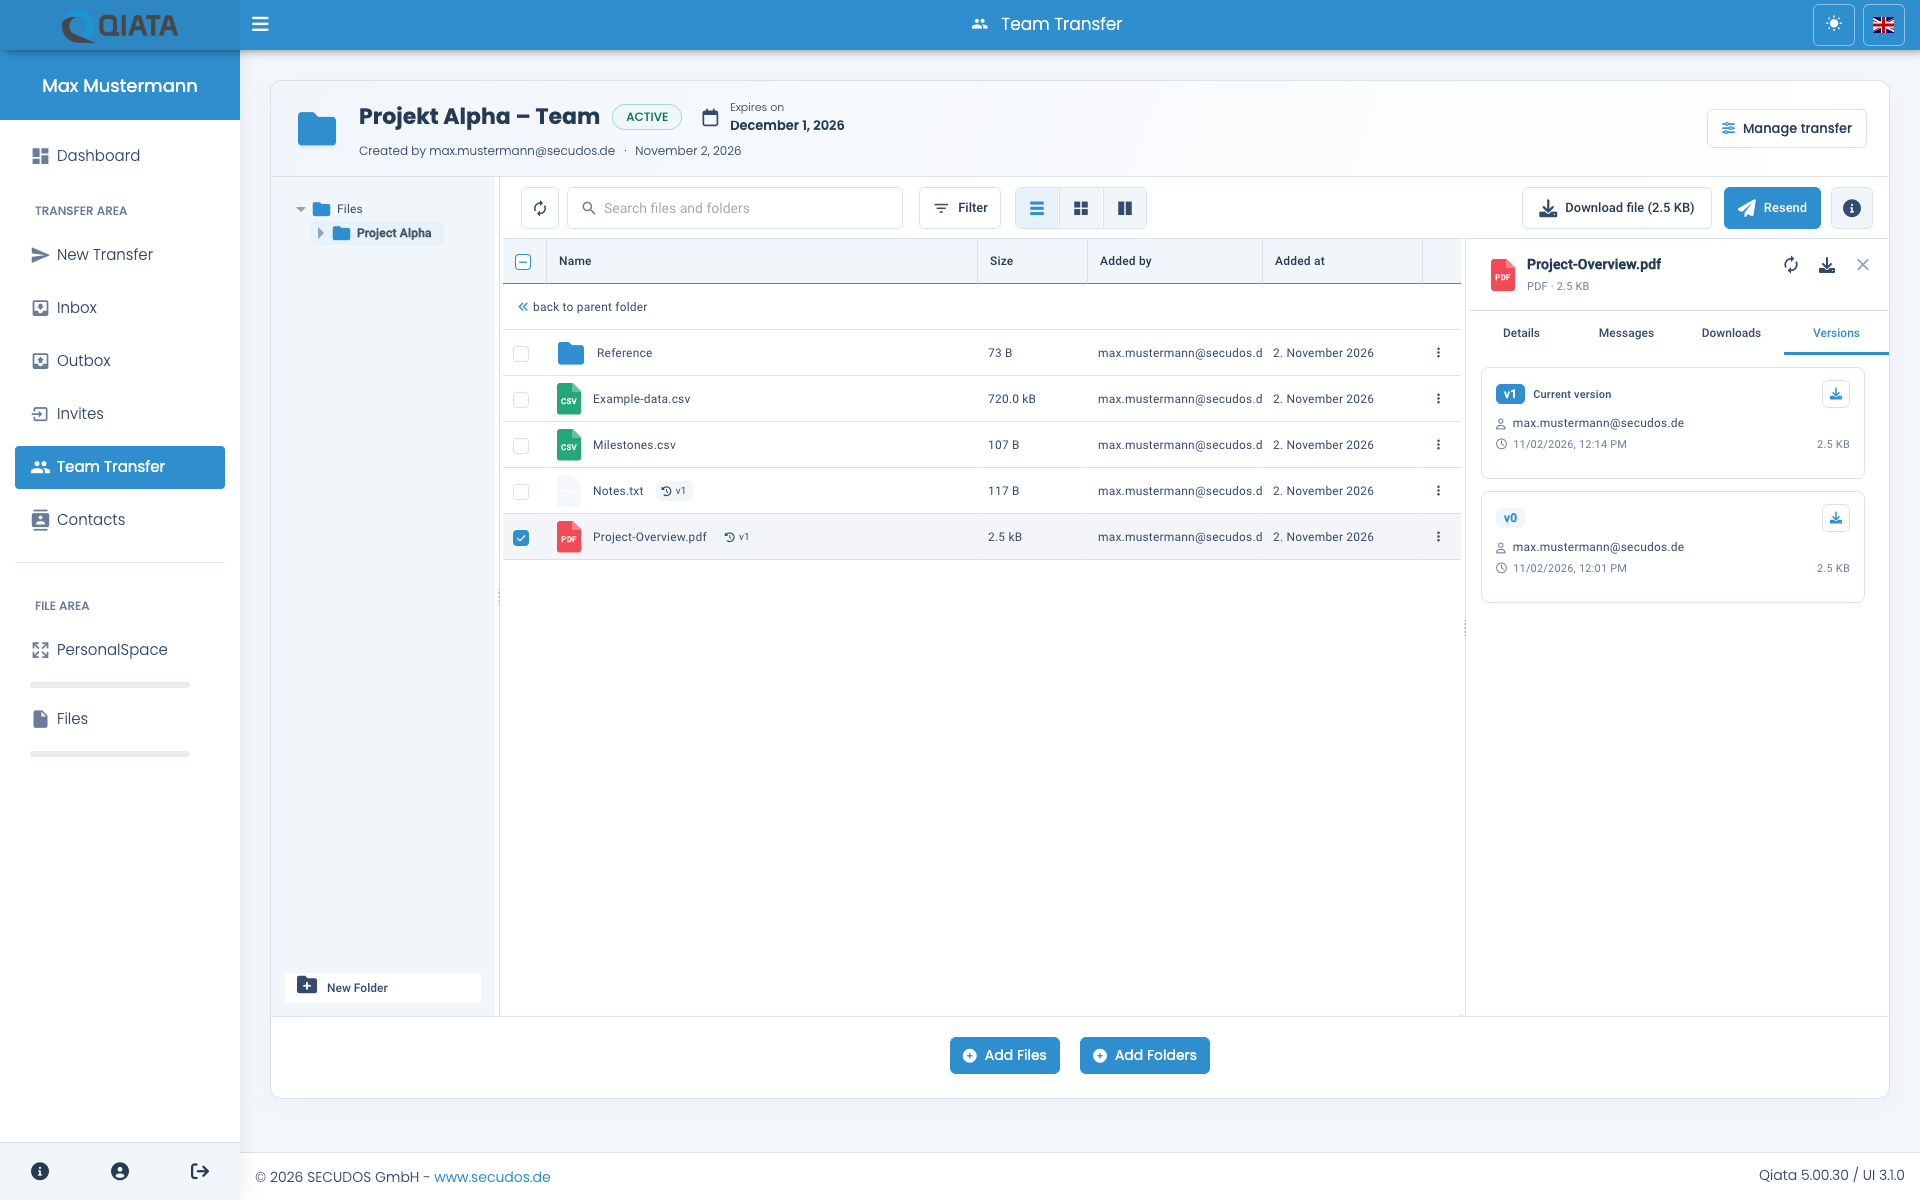
Where an existing file is updated as a new version, its version history becomes available:
- Select the file.
- Open Versions in the context menu or details panel.
- Check the current and earlier versions and available date/user information.
- Use the offered download action if you need a particular version.
Version history relates to the selected file. It is different from the event history of the whole TeamTransfer.
Discuss the TeamTransfer or an individual file
General project messages are available in transfer management. Selected files may also offer file-specific messages. Choose the appropriate area to make the context of your message clear.
Before posting, check which transaction or file the message belongs to. Notifications for other members follow the available functions and settings.
Download a folder as ZIP
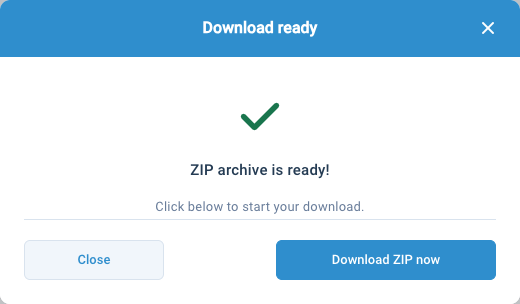
Select a folder and choose Download as ZIP. Qiata prepares the archive on the server. Larger folder structures may take some time.
Use the offered background option to return to the workspace while preparation continues. For all content, return to the Files root and use the offered ZIP action without restricting it to one subfile. The root itself is not a deletable project folder. Once the archive is ready, start its download from the displayed notification or download action. A prepared ZIP archive has not necessarily been saved to your device yet.
Inspect and acknowledge errors
An error indicator on a TeamTransfer opens its history with the relevant error filtering. Review the affected event and address the cause where possible.
Acknowledge errors marks existing warnings as seen for your own display. History entries remain available. Acknowledging an error does not repair the failed action, and new errors can produce another warning.
Manage validity and status
Through Manage transfer, authorized people can edit options such as the title, invitation text, validity and on-hold status. Save changes explicitly.
You can still inspect expired or paused TeamTransfers where your membership and the available state permit it, although uploads or downloads can be blocked.
The list's delete action can remove a transaction for an authorized owner or leave a TeamTransfer for a member. Always check the confirmation.
Updated invitation text is used for the available subsequent invitations. Merely saving it does not mean that an email is sent again to every existing member.
Receive files as an external recipient
External accounts may be restricted to the transactions shared with them. Such accounts cannot necessarily sign in to the full internal interface. You do not need access to that interface to receive files. Open your personal notification link and follow the access steps shown.
- Check the sender, subject, message and validity.
- Enter a requested PIN or the required account credentials.
- Select the files or available folder download action.
- If ZIP preparation is required, wait until the download is ready.
- Save the files and check completion in your browser.
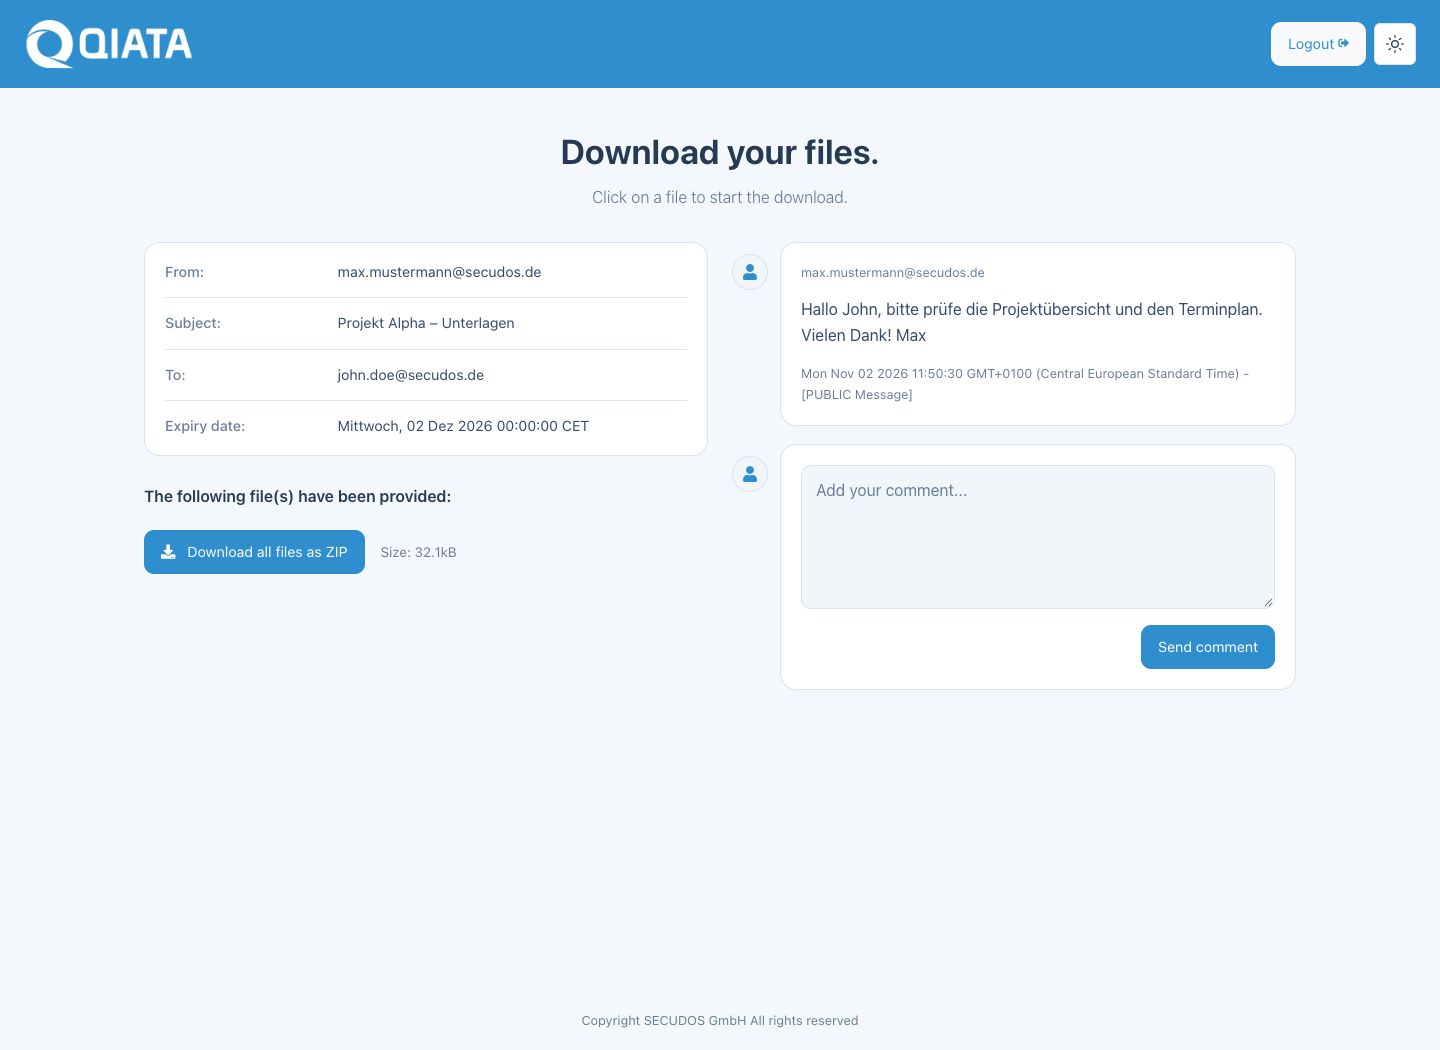
For an invitation, the external page allows you to submit your files. For a TeamTransfer, you work in the shared file area with your assigned rights. A read-only member cannot gain write access merely by selecting another folder.
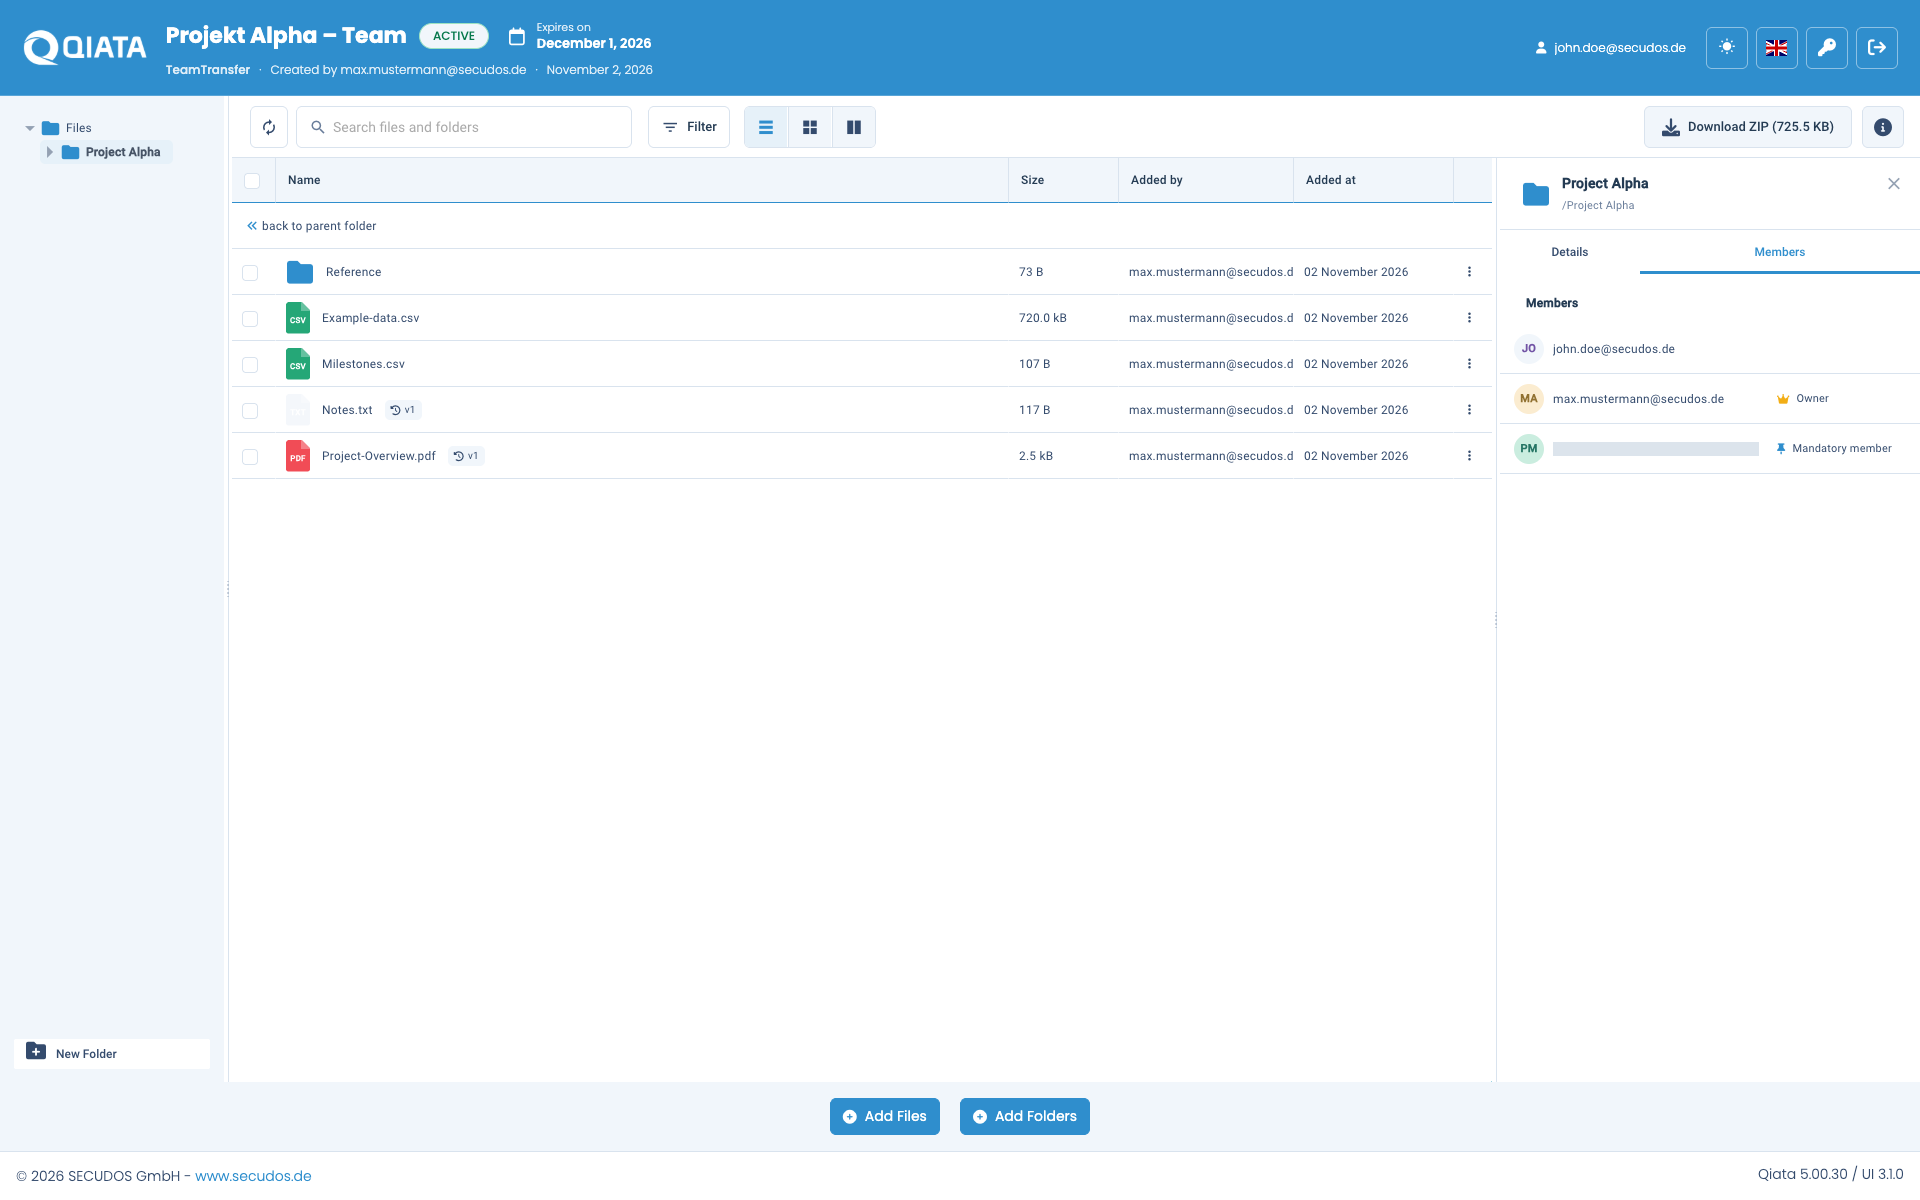
Treat notification and access links as confidential. Do not forward them indiscriminately. If another person needs access, add that person as a separate recipient or member.
Use PersonalSpace and MultiSpace
PersonalSpace is your personal storage area within the MultiSpace feature. It is separate from files in individual transfers and the shared TeamTransfer workspace.
Store and reuse files
Open PersonalSpace. Use the file manager's available storage actions to add files and folders. Available capacity is shown on the Dashboard and in the relevant storage indicators.
To send stored files, select them and choose Transfer selected items. Your selection is carried into transfer creation. Add recipients and a message, then review the transfer settings.
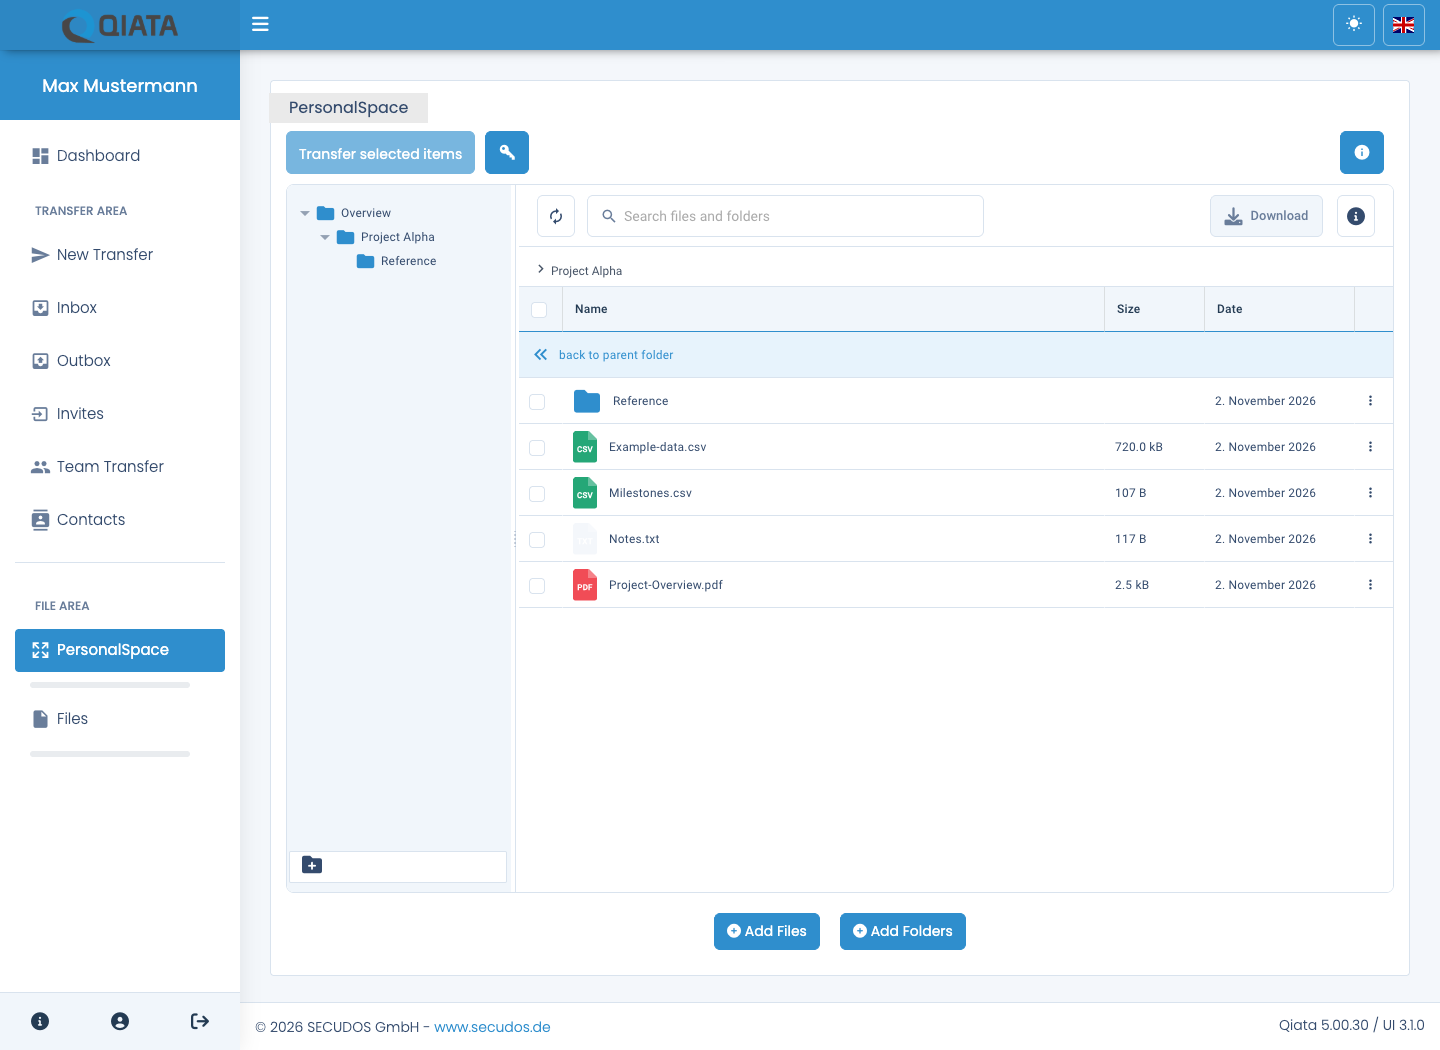
Using PersonalSpace files creates a copy in the transfer area and consumes additional transfer quota. Normal policies, virus scans, quota checks and auditing apply there. PersonalSpace must be enabled for your group.
The download action requires the browser's file-saving capability. If missing, the action is not offered. Do not overlook the earlier Firefox/Safari limitation: if you cannot download here, use an approved browser with the required saving support or your organization's WebDAV connection. Selecting a folder does not automatically make a direct PersonalSpace folder download available.
Access through other applications
If your organization provides access through other applications or a network drive, use the relevant PersonalSpace buttons to view the connection information. An application-specific password, separate from your regular sign-in, may be required.
For WebDAV, you need the displayed PersonalSpace path, your username and the application-specific password. Use the information dialog to find connection details. The password action lets you set a new password or, where offered, generate one and send it by email. Update the credentials in connected applications afterward.
Automatic network-drive setup is only offered in supported environments. On other devices, use the connection details provided by your administrator. Keep these credentials confidential.
Reuse existing transfer files
Files lists the transfer files available to your account in that area. Use folder navigation and search to select the required contents.
- Select the files or folders.
- Choose Send as New or the corresponding transfer action.
- In the new transfer form, enter recipients, subject and message.
- Add local files or PersonalSpace content if needed.
- Review the selection and send the new transfer.
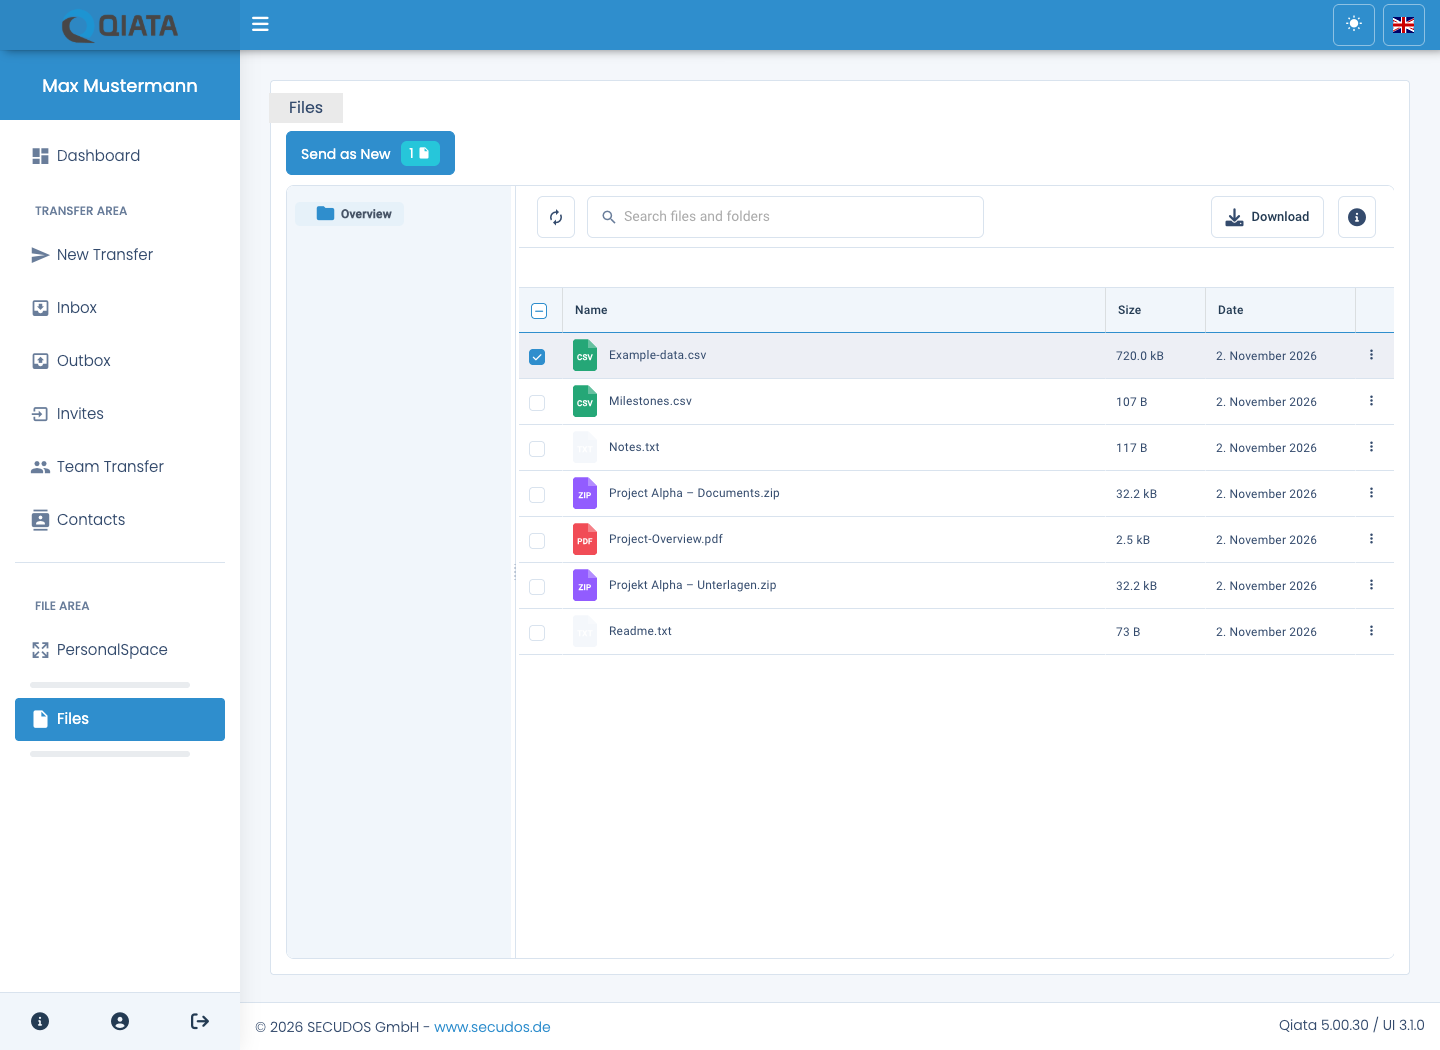
This creates a separate transaction. Sending files again does not extend the recipient list of the original transfer.
Contacts and contact lists
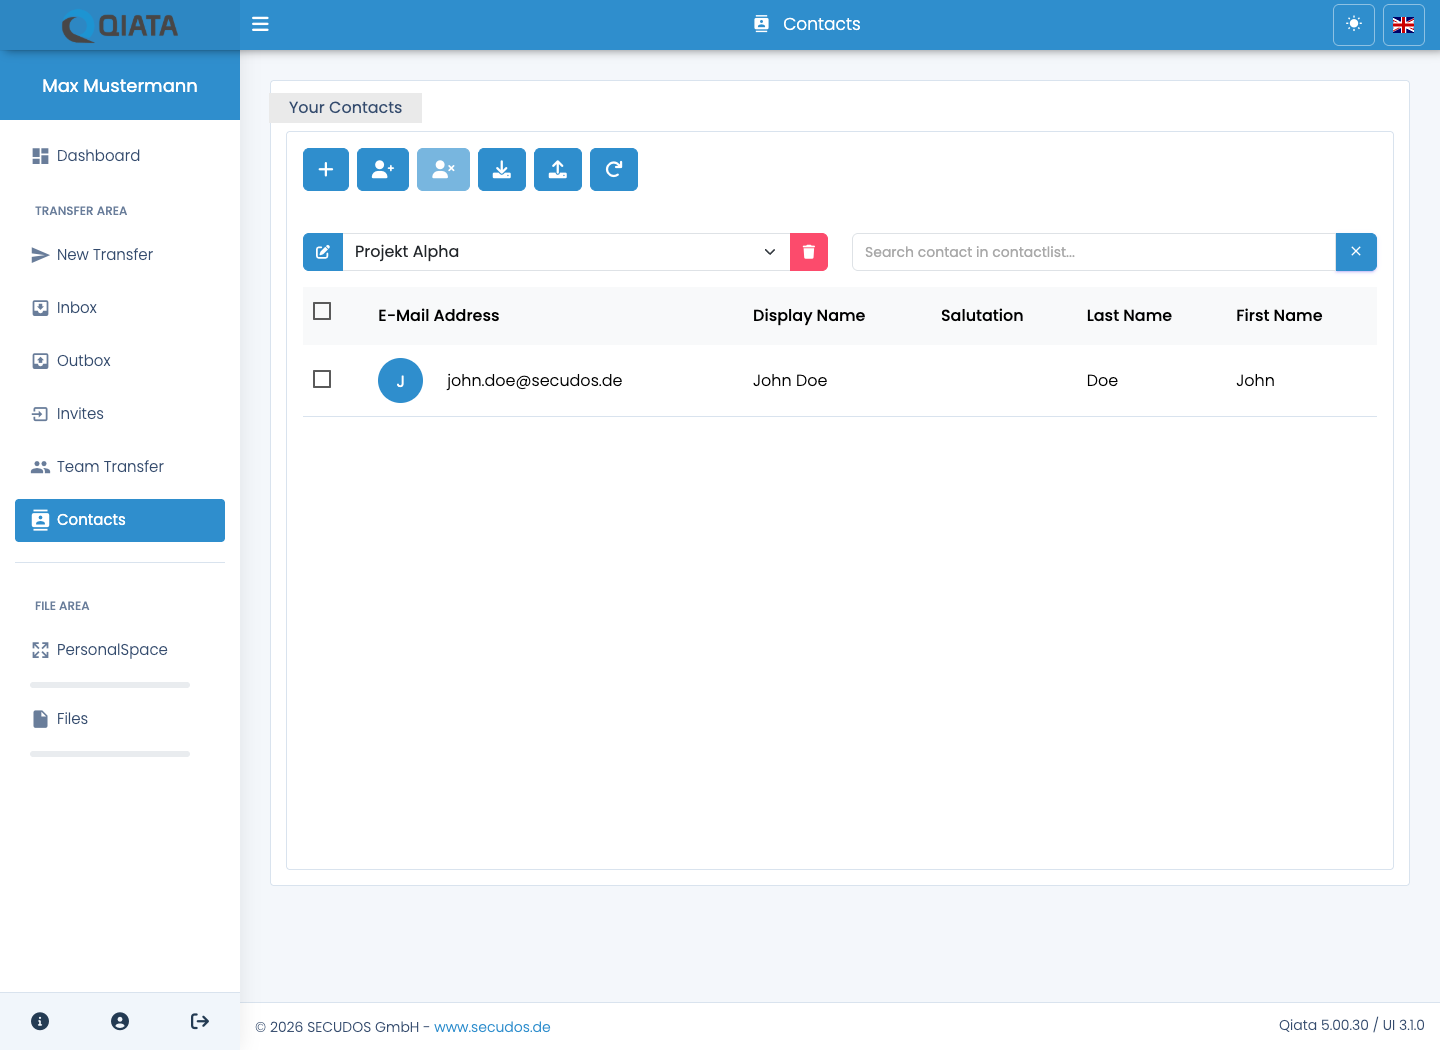
Use Contacts to maintain addresses for transfer creation. Select the required contact list first.
- Create new list: Create your own list.
- Create new contact: Enter an address and the desired names.
- Edit: Update an existing contact or a list you own.
- Export / Import: Exchange contact data through a CSV file.
The default list for your own contacts cannot itself be deleted or renamed; your contacts within it can be edited. Where offered, share new lists with My Group or Everybody in your organization. Other users can use a shared list without gaining editing rights.
Select a contact to edit its display name, email, title, first/last names or list memberships, then save explicitly. To delete your contacts, select them and use the delete action.
For an export, select the contact list and choose Export. The file uses UTF-8-BOM; your browser controls its save location.
Shared lists may be read-only. Your permissions determine whether you can change or share a list.
Import contacts
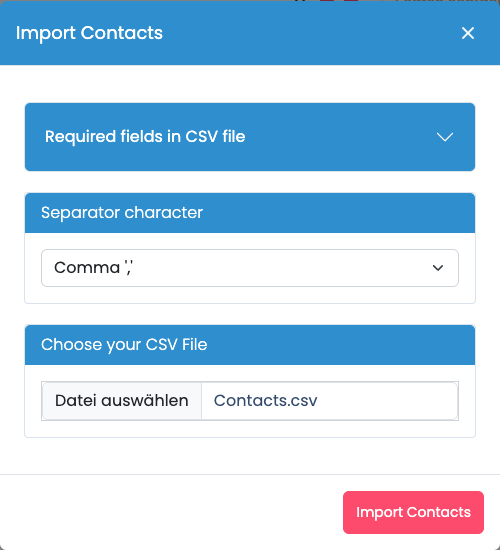
Open Import contacts and read the format information provided in the dialog. Supported column names include:
| Column | Contents |
|---|---|
TITLE | Salutation |
DISPLAYNAME | Display name |
FIRSTNAME | First name |
LASTNAME | Last name |
EMAILADDRESS | Email address |
The import file must use UTF-8 or UTF-8-BOM. Copy the column names exactly. EMAILADDRESS is mandatory and must contain valid, unique addresses; other fields may be empty. Available delimiters are comma, semicolon and vertical bar (|).
Select the delimiter that matches your file, then select the CSV file. Wait until the file has been uploaded and select Import Contacts. Check the success message and inspect the destination contact list.
For a first attempt, use a file containing only a few example contacts.
Personal settings
Open My Settings on the Dashboard or use the corresponding navigation icon.
Security settings
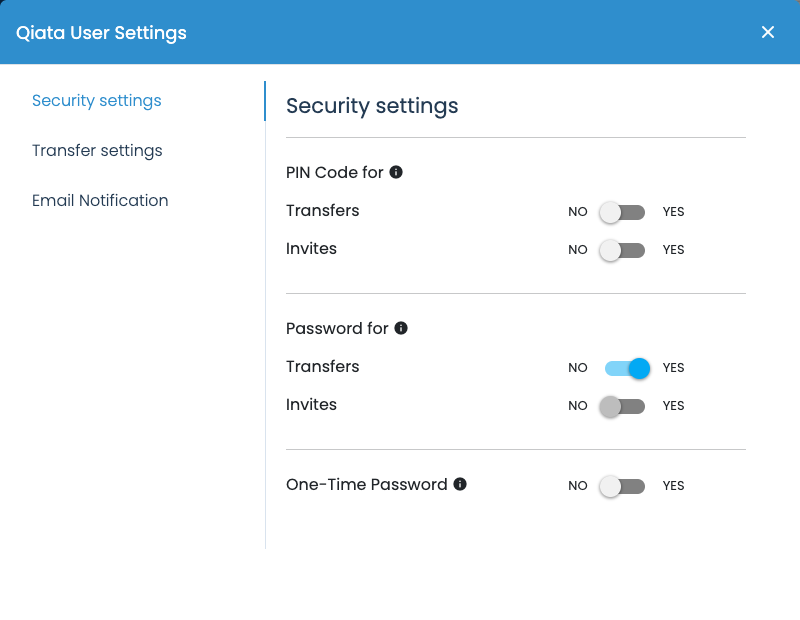
Set the available protection defaults for transfers and invitations, such as additional PIN or password requirements. One-Time Password protects sign-in to your account. The following section explains the complete workflow.
OTP: set up and use one-time passwords
One-Time Password adds a second factor to your Qiata sign-in. In addition to your normal password, you enter a time-limited code from an authenticator app. Use an app approved by your organization that supports time-based one-time passwords (TOTP).
This section covers the second factor provided by Qiata. Microsoft Entra ID/AzureAD and other external providers use their own multifactor procedures, so the Qiata option may be absent. Your administrator may also enforce or lock this setting.
Enable OTP for your account
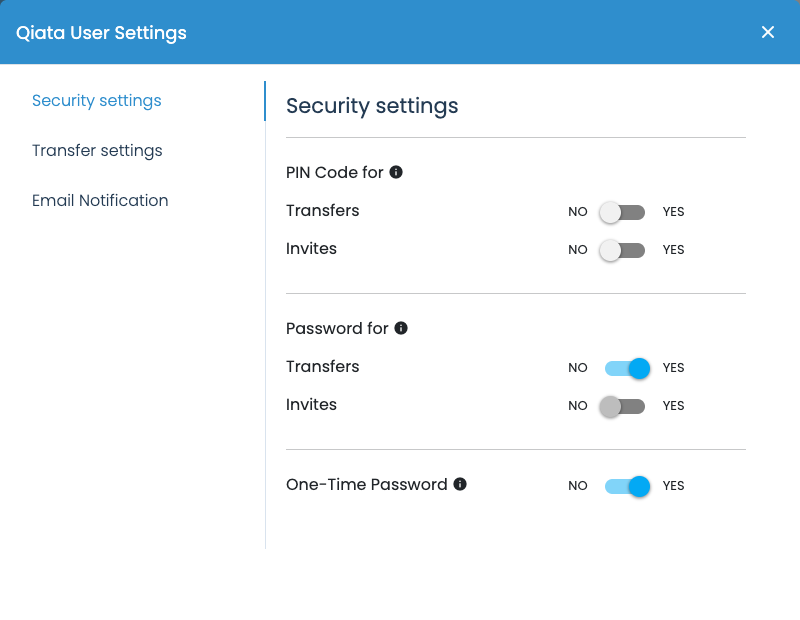
- Open Dashboard → My Settings → Security settings.
- Set One-Time Password to YES.
- Select Save changes and wait for confirmation. The notice explains that setup follows at the next sign-in.
- Sign out using the sign-out icon, then sign in again with your email address and normal password.
If the setting is already enabled but no app is connected, the next sign-in also starts setup. Contact your administrator if the switch is locked.
Connect Qiata to your authenticator app
The setup page contains “1) – Connect your Account” and “2) – Verify your connection”.
- Open your authenticator app and choose its option to add an account.
- Scan the QR code displayed on your own Qiata page. If scanning fails, use the alternative setup key shown below it with your app's manual account setup. Select time-based codes if the app asks.
- The app now generates a six-digit code for the Qiata entry.
- Enter the current code in the second section of the Qiata setup page and select Verify OTP Code.
- The connection is confirmed only after successful verification. Continue by securing your backup codes.
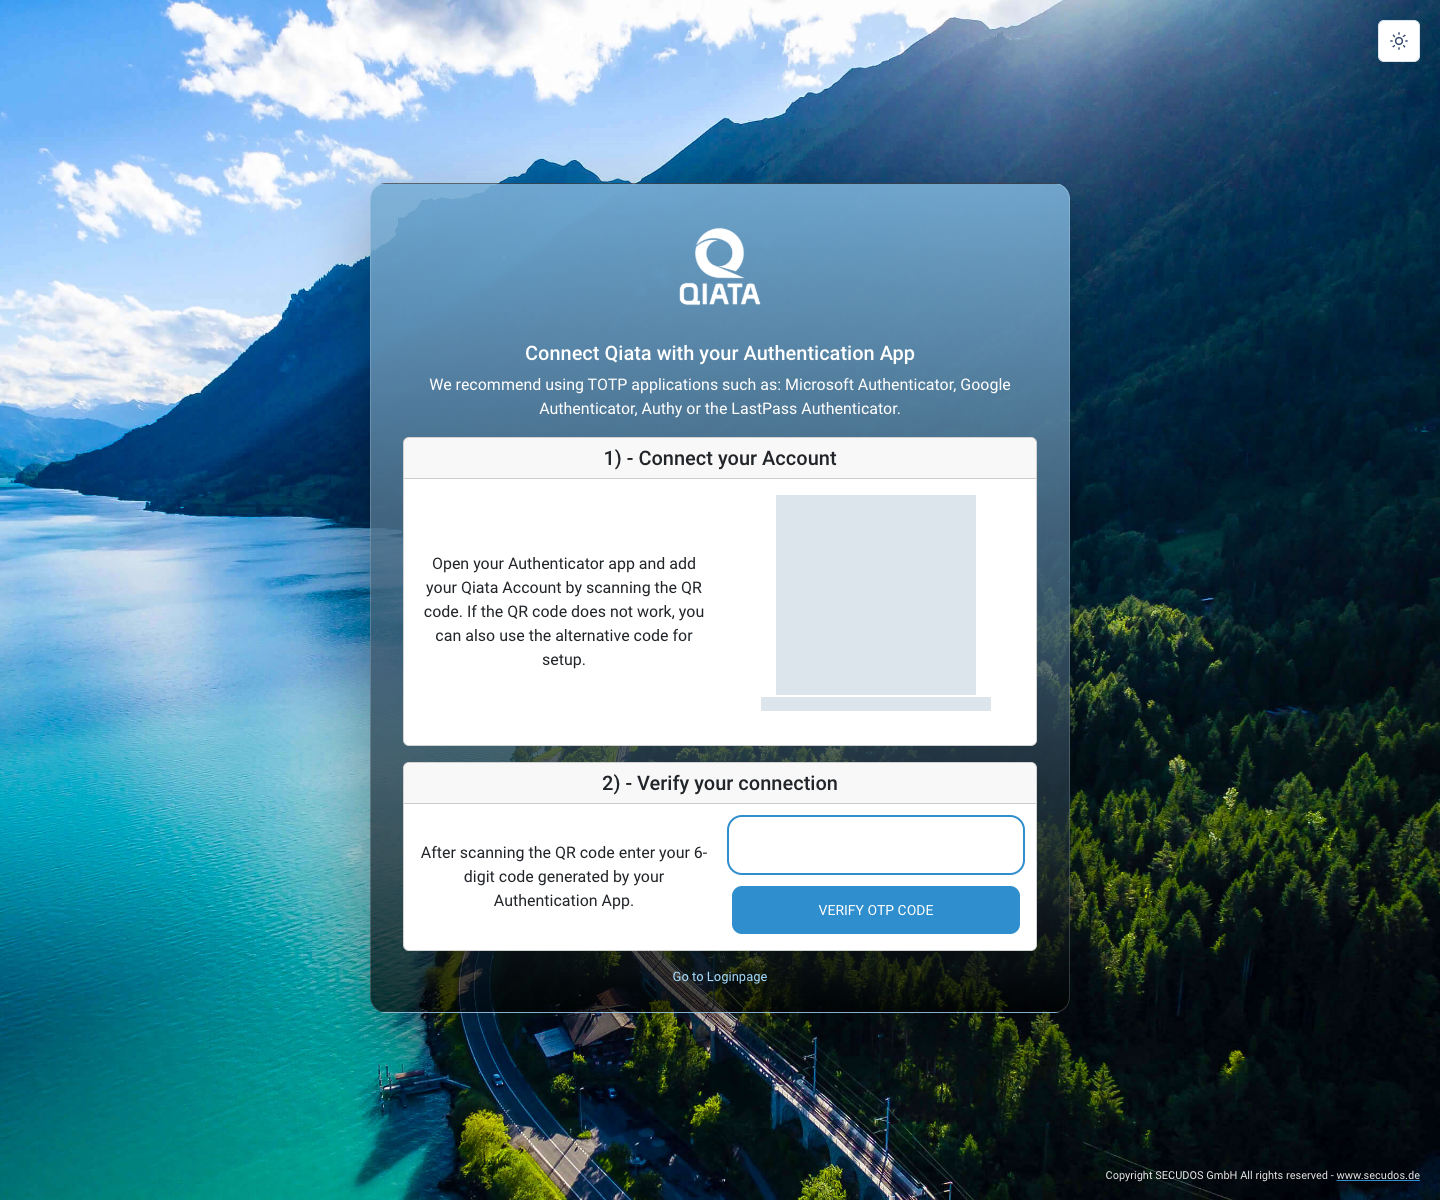
Both are masked in the illustration. Use the values on your own Qiata page. Anyone with the QR code or setup key can generate codes for this account. Do not include them in support requests or publicly shared images.
Store backup codes securely
After successful setup, Qiata displays the completion page with backup codes. Store them securely before leaving the page. Print Codes Now opens the offered print view; use only an appropriate protected destination or a trusted printer.
- Codes are provided during this setup step. Do not assume you can display them again later.
- Each backup code can be used to sign in once.
- Keep them separately from the device holding your authenticator app. A photo stored only on that phone will not help if the phone is lost.
- Protect backup codes like your password. This guide deliberately shows no usable codes.
Then select Go to login page to return to sign-in.
Sign in with OTP afterward
- Enter your email address and normal password on the sign-in page.
- Open the correct Qiata entry in your authenticator app.
- Enter its current six-digit code in the one-time password field and confirm sign-in. You can also paste a complete code.
The code changes regularly. If it has just expired, use the next code shown by your app. OTP is neither your normal account password nor a transfer PIN. A valid existing session may let you return without entering another code; an expired session can require a new sign-in.
Rejected codes or an unavailable phone
| Situation | What to do |
|---|---|
| A code is rejected | Check the correct Qiata entry in the app and use a fresh code. Check your device's automatic time setting. Do not keep retrying indefinitely; attempts are limited. |
| All setup attempts have been used | Follow the offered link back to sign-in and restart the intended setup process. Contact your administrator if the problem persists. |
| The phone is lost or the app is unavailable | Enter an unused backup code in the OTP field instead of the app code. That backup code will no longer be available afterward. |
| Neither the app nor a backup code is available | Contact your administrator. They can reset the OTP connection so that setup starts again at your next sign-in. |
| You are replacing your phone | First ensure that you have an approved recovery method. Arrange any necessary setup with your administrator before removing the old app. |
Where permitted, change the OTP requirement in Security settings. Selecting NO and saving disables the requirement but does not automatically remove an already confirmed authenticator connection. Ask your administrator to reset that connection, for example after device loss. You cannot disable an administrator-enforced requirement yourself.
Transfer settings
Set the available defaults for download/upload counts, validity and your signature. These values are a starting point for new transactions. Administrator-enforced settings still take precedence.
The signature field supports text only. HTML and CSS styling are not available here.
A signature is added to the message text. Use the supported text input. The signature field does not change an email template or company logo.
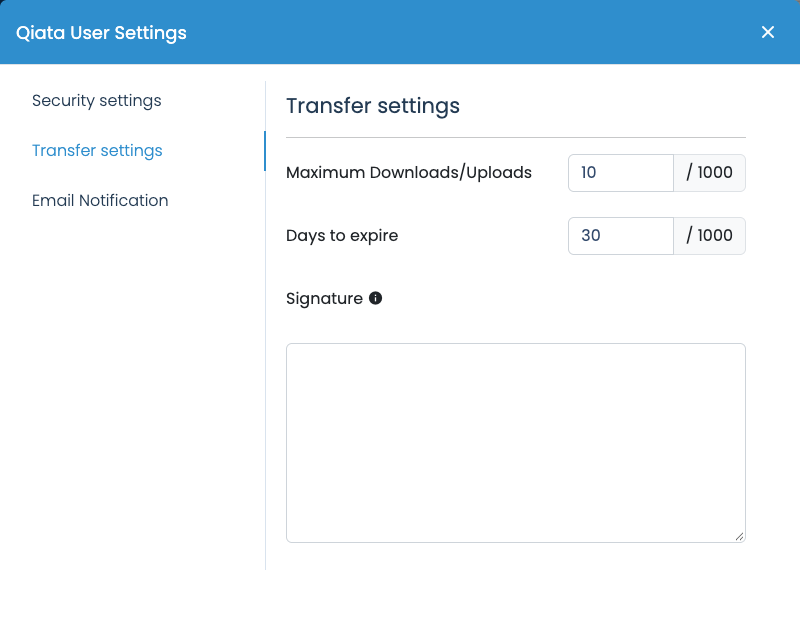
Email notifications
Choose the available notifications and reminders, for example on sending, download or expiry without completion. Not every option applies to every transfer type.
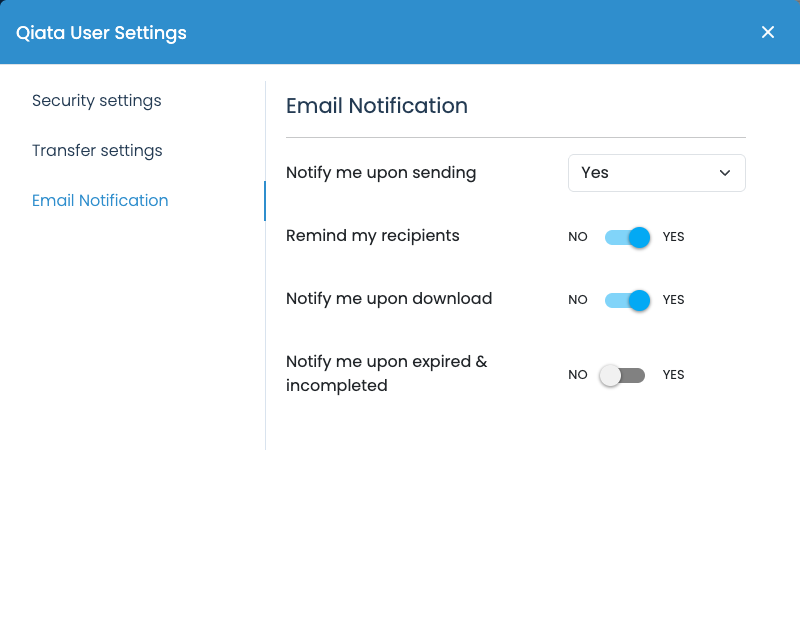
Personal settings apply across your account and may affect other Qiata clients. You can override permitted defaults per transfer; enforced settings remain binding.
Apply changes with Save changes and look for confirmation. Personal defaults do not replace reviewing the settings of an individual transfer.
Use Qiata on a mobile device
Open Qiata in your smartphone or tablet's browser. On narrow screens, open navigation with the menu icon. Actions may be condensed into icons, and further file actions are available through the three-dot menu.
Use the file picker provided by your device. Selecting complete folders and saving downloads depend on the browser and operating system. The desktop view is easier to use for large folder structures and extensive permission management.